Task workflows
todo.vu uses a Kanban task management system combined with task lists to help you visualise and prioritize your work, and find and track specific tasks and details quickly and easily.
- Where tasks are managed in todo.vu
- Workflow statuses in todo.vu’s Kanban system: ‘Snoozed’, ‘To do’ and ‘Done’
- Different Task Dashboard views
- Different task views
- How and why to use the Task Dashboard context filter
- ‘Favouriting’ specific filtered views
- Moving tasks through workflow statuses
- Workflow status notifications
- Task sorting settings
- Task labels for custom workflows
- Keyboard shortcuts
Where tasks are managed in todo.vu
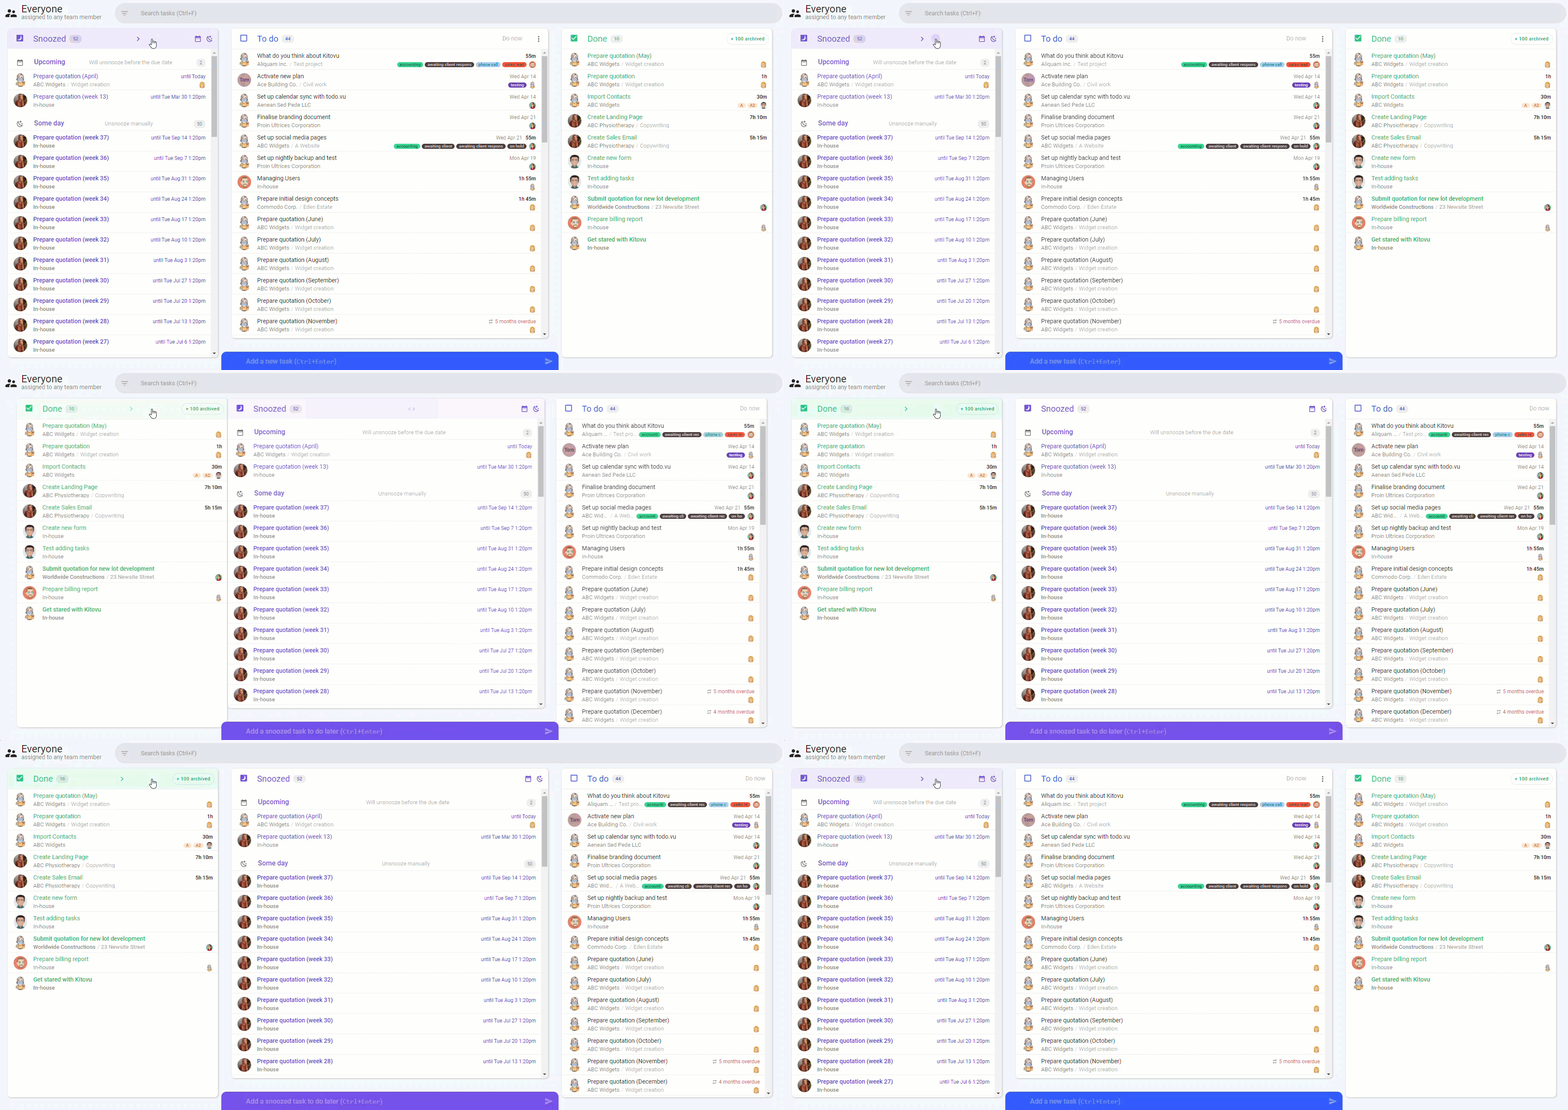
In todo.vu, your tasks are viewed and managed in a unique Task List / Kanban task management system on the Task Dashboard page.
Tasks appear in lists, which are arranged into three clear Kanban columns according to their workflow status: either ‘Snoozed’, ‘To do’ or ‘Done’. Tasks can easily be added to or moved between columns, and your entire Kanban view can be filtered to view tasks according to their specific details, such as tasks grouped to a specific client or project.
When you log in to your workspace, todo.vu will open to the Task Dashboard page by default. However, you can navigate to the Dashboard at any time by selecting the top icon on the left sidebar of your workspace; the ‘Tasks’ option.
Workflow statuses explained: Snoozed, To Do and Done
In todo.vu, your tasks are organized by their workflow status. Every one of your tasks will adopt a workflow status.
In addition to the ‘Snoozed’, ‘To-Do’, or ‘Done’ workflow statuses, a task can adopt a ‘Draft’ or ‘Archived’ status. A task will never be without a workflow status; it cannot exist in the workspace without one.
Let’s explore each of the workflow statuses in more detail:
Snoozed
The ‘Snoozed’ workflow status contains tasks that do not require immediate attention. These tasks stay out of your immediate ‘To do’ task list, so it can remain clear and manageable. However, ‘Snoozed’ tasks are still able to be captured and stored for future work.
When you add a task to ‘Snoozed’, you can leave it there until you choose to revisit it.
You can also configure ‘Snoozed’ tasks to move automatically to ‘To Do’ after a certain date or action has been taken; see below for more details on how to do this.
To do
Typically, your ‘To do’ workflow status will include priority tasks — tasks which are either in, or soon to be in, progress.
Your ‘To do’ list helps you stay on top of your workflow, as you have a clear view of what needs to be done, and by when, without distractions.
Learn more about creating tasks, and specifically creating tasks by email.
Done
When a task is marked as ‘Done’, the task will move into the ‘Done’ Kanban column.
You can mark a task as Done from within that task, or you can drag it from the ‘To do’ to the ‘Done’ column with the drag n’ drop function.
Plus…
Draft tasks:
Draft tasks can only be kept as drafts in the ‘To do’ column. Draft tasks will begin with “DRAFT” in the task title.
Draft tasks allow you to create complicated tasks over longer time frames while keeping them private, as the task assignee and followers will only be notified once the task is no longer in Draft mode. You can even start the task timer on a draft task to track the time it takes you to create it.
Tasks edited in Draft mode will remain as Draft tasks until you click, ‘Create task’.
Archived tasks:
Your Archived tasks are found within the ‘Done’ tasks column and hidden by default. You can see archived tasks by clicking on the ‘archived’ button in the top right of the ‘Done’ header.
Archived tasks enable you to safely hide, rather than delete, your information, so you can keep your workspace clear and tidy without having to risk any loss of data or critical information.
Deleted tasks:
You can only delete a task if you were the task creator, and no time has been logged to that task. Deletion is permanent and there is no way to search for and recover deleted tasks.
Delete a task using the three-dot menu on the top right-hand side of an opened task.
Viewing your Task Dashboard
By default, your todo.vu Task Dashboard will display your tasks in lists in three columns, with your ‘Snoozed’ column on the left, your ‘To-do’ column in the middle, and your ‘Done’ column on the right.
You can change this order if you like, or enable ‘Focus mode’ to expand and view just one column’s task list on your Task Dashboard.
Here’s how:
Change column order
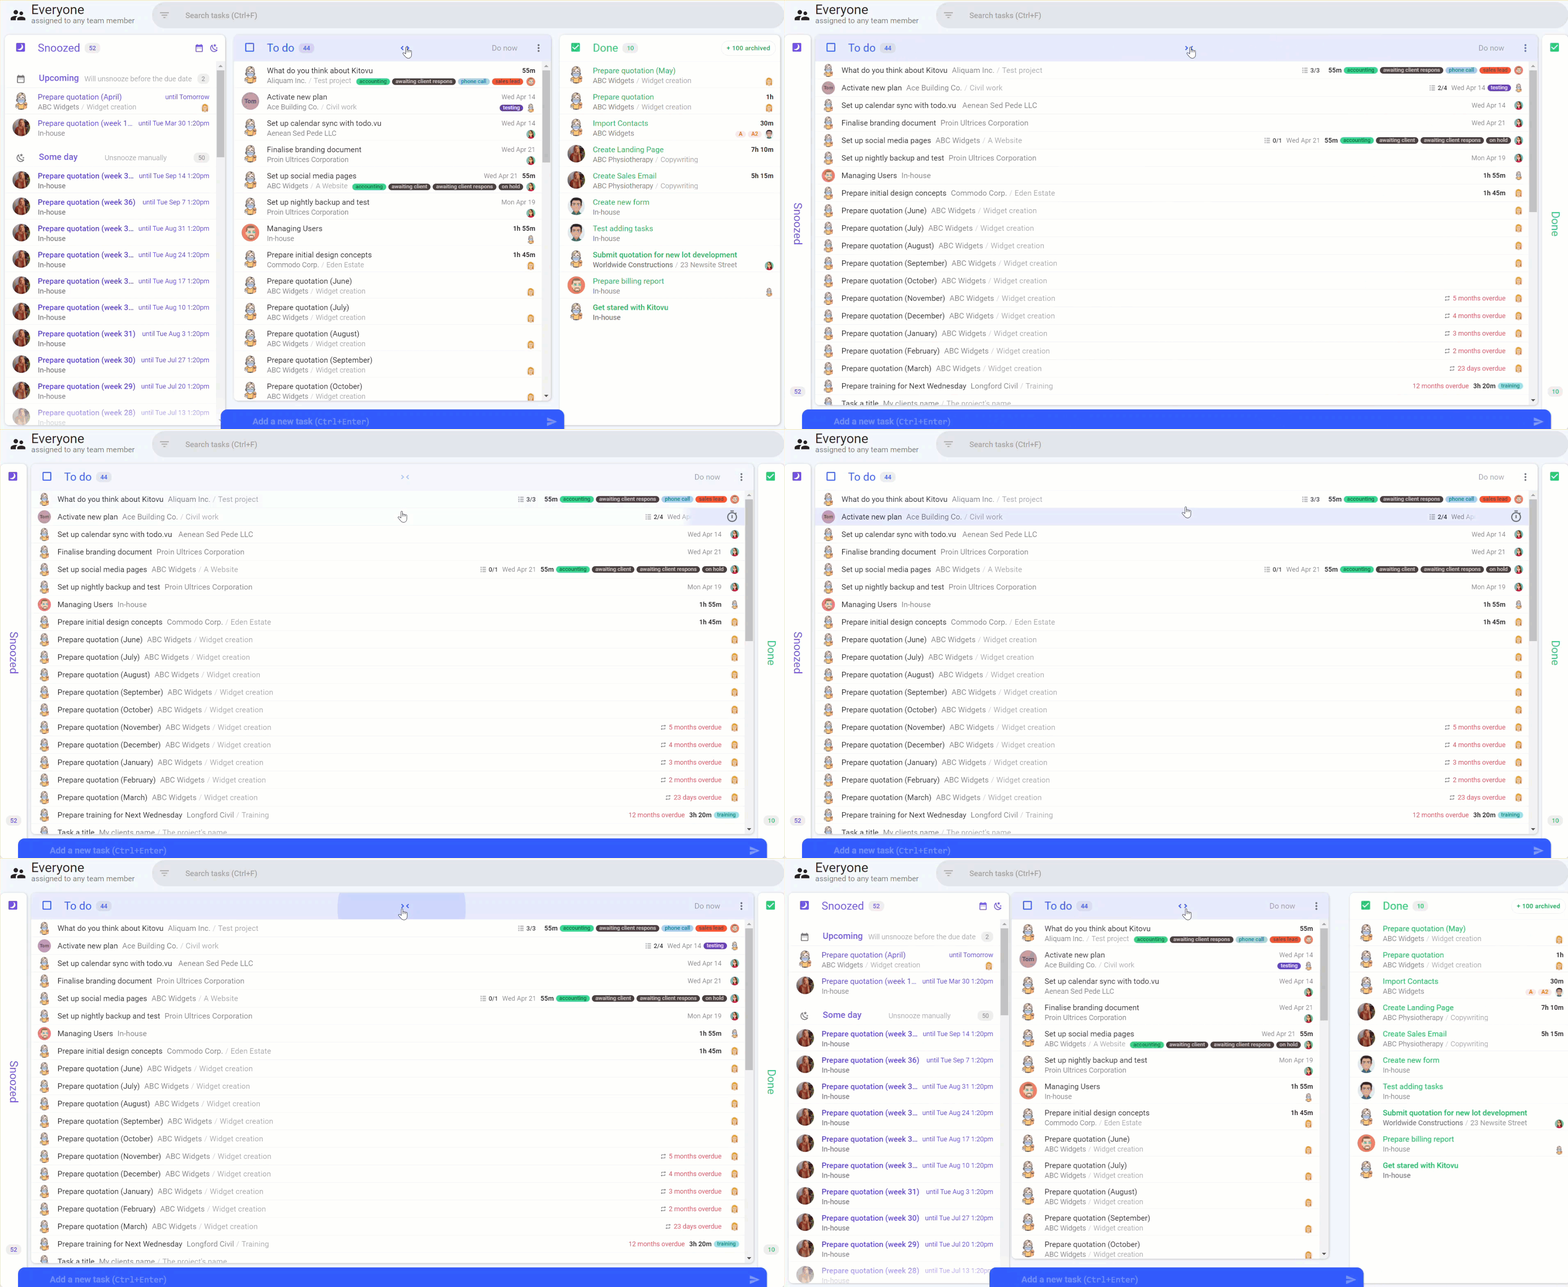
To change the column that sits in the middle of your Kanban columns, click the angle bracket (>) or (<) at the top of the left or right columns.
The angle bracket should appear as you move your cursor over the headers, unless your screen width is too small.
Otherwise, you may only have to click your cursor anywhere on either of the two outer columns to move them to the middle, or at the bottom of the screen for very small screen widths.
However, the Task Adder bar works only on the current Kanban column occupying the middle column, what we call the ‘Primary’ column. So, to add a task to a different Kanban column, you have to change your Primary column by changing the column order, as explained above.
Expand Kanban columns
To make better use of screen space, you can expand your Primary (middle) column to enable ‘Focus mode’. Simply click on the angle brackets (< >) that appear on the Primary column header.
To disable Focus mode, simply click the brackets (> <) again.
Viewing tasks within the Task Dashboard
You can view and interact with tasks in a way that works best for you by configuring your task view settings. This determines how each of your tasks is viewed individually when opened.
The different task view options are:
c) Task view – Side-by-side
Tasks will open beside your task listing on your Task Dashboard. Your open task will change as you select different tasks from within the task listing.
This tabular view is common to many email platforms.
a) Task view – Full screen
Open tasks will display in full-screen view. Only the workspace header and left sidebar will be visible in addition to your open task.
Task context filter function
When you manage multiple clients, projects, tasks and team members, not to mention different labelling systems, it can be hard to see everything that you need to do, especially all in one place on the one dashboard.
That’s why many other task management systems will have you create new areas, sections or ‘boards’ to further organise your work. Instead, todo.vu incorporates comprehensive, but easy-to-use, filter functions on the Task Dashboard.
With these filters, you can refine an entire workflow — that is, all tasks ‘Snoozed’, ‘To Do’ and ‘Done’ — for any specific context you want. Then, you can save this ‘context’ to come back to it at any time. There’s no need to change systems or boards.
You can use the search bar, the three-dot menu embedded in the right of the search bar, or the hamburger icon to the left of the search bar to filter for:
- Tasks grouped to a specific project
- Tasks grouped to a specific client
- Tasks related to a team member(user)*
- Tasks marked with a specific Label
- Tasks according to time logged and billed to them
- Tasks containing a keyword (search bar only).
You can use one filter or a combination of filters to see tasks related to a unique context in seconds.
Simply start typing in the search bar to filter tasks, or select options either on the left within the hamburger menu, or the right within the three-dot menu.
‘Favourite’ frequently-used context views
Once you have filtered for a specific context (or view) on your Task Dashboard, click the star icon at the right-hand side of your the search bar. This allows you to ‘favourite’ the specific filters you have used, so you can quickly navigate to different views with a click of your mouse whenever you want to.
To search for and navigate to your favourited views, simply click on the star icon the the right of the search bar.
The same filtered context will show across all of your devices, no matter which you are working from, making it super simple to pick up where you left off.
Moving tasks through workflow statuses: Manual option
You will want to move tasks through workfow statuses; for example, from ‘To do’ to ‘Done’, as you complete them.
There are a few different ways you can do this, the quickest are to:
- Select the task’s status field (but not necessarily the checkbox) at the top left-hand side of an open task. Select the workflow status from the drop-down menu that appears. You can also update certain workflow statuses on tasks, like from ‘To do’ to ‘Done’, by directly selecting the checkbox.
- Drag and drop the task to the desired Kanban column, and the task will automatically adopt that status*
- Click the avatar on your selected task/s in your task listing, and use the options on the drop-down panel at the top of your dashboard to change the selected task/s workflow status/es.
Moving tasks through workflow statuses: Automatic option
You can only set up ‘Snoozed’ tasks to automatically change workflow statuses.
To configure Snoozed tasks to move automatically through the workflow, hit the Status checkbox of a your Snoozed task (or any task; you can mark ‘To do’ and ‘Done’ tasks as ‘Snoozed’ with this option, if you want to).
Select the ‘Snooze’ option to open the drop-down menu. You will see three options; select one based on the action you’d like to configure.
- Until unsnoozed manually
- Until another task is done
If you choose this option, you will then be prompted to select another task that, once its workflow state is ‘Done’, will automatically move your ‘Snoozed’ task to the ‘To do’ workflow state.
- Until a given date
If you choose this option, you will then be prompted to select a date at which your Snoozed task will automatically move from ‘Snoozed’ to ‘To Do’.
Workflow status notifications
Any time a task is added to or moved between the three Workflow statuses, each follower of that task will receive a notification.
Task creators can override Workflow status changes; for example, if you had assigned a Task to a team member who marked it as ‘Done’, you can revert the Task back to ‘To do’ and add a note with further instruction.
Task sorting settings
Now that you understand how tasks are organised and managed on todo.vu’s Task Dashboard, let’s discuss how to organise your tasks within the Kanban columns themselves.
You can only access your task sorting settings within the ‘To-do’ task column while it’s positioned in the middle of the three-column layout.
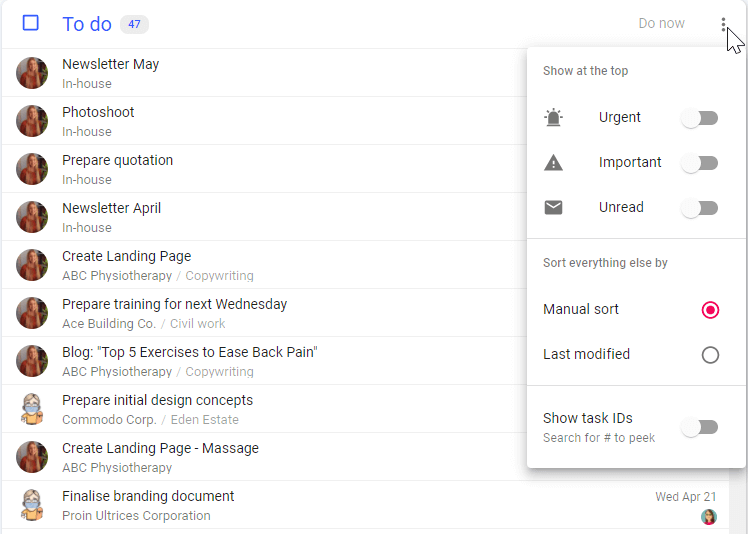
Click the three-dot menu at the top right-hand side of your To-do column to see, and modify, options for sorting tasks.
These task sorting settings are as follows:
1. Show at the top
The task sorting settings under ‘Show at the top’ apply to the ‘To-do’ column only.
You can enable tasks to appear at the top of your ‘To do’ column list when the tasks:
- are Urgent
- are marked as Important
- are Unread or
- have a Due Date.
Your tasks are automatically flagged as ‘Urgent’ if they are due before the next business day. Your tasks are automatically flagged as ‘Unread’ if actions have occurred on the task since the last time you logged in, such as a user has left a comment on it.
You can manually mark a task as ‘Important’ and apply a due date to your task. Learn how here.
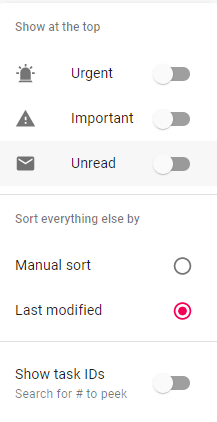
2. Last modified view
Underneath the ‘Show at the top’ options for sorting your tasks within the ‘To do’ column, you will see options for sorting tasks which are not marked according to any of the ‘Show at the top’ conditions.
These options are:
- Manual sort
- Last modified.
By default, Manual sort is enabled, which means that you can drag and drop tasks within and between columns as you please. If you select ‘Last modified’, you will not be able to move tasks with the drag n’ drop function.
The Last modified view applies only to the list of tasks in the ‘To-do’ column. It is handy for an admin overview of what is happening across your business, as the list acts like a timeline of activity within your entire workspace.
However, if you have enabled Important, Urgent or Unread options, these will still show at the top, regardless of when tasks were last modified.
3. Show task IDs
For a cleaner, clearer overview of your workflow, you can choose to disable Task IDs from appearing in your dashboard. Flip the switch again to enable.
Use task labels for custom workflows
You can personalise your workflows in todo.vu even further by using task labels.
For instance, a software company may create task labels to signify certain states such as “In testing” or “Deployed”. Consultants may create a Label like “Awaiting client response”.
You can create custom labels to use on your tasks as necessary and reap the benefits of an even more organised workflow.
Keyboard shortcuts
So that todo.vu is quick and easy to navigate, we have implemented several keyboard shortcuts, for example:
- [Ctrl]+F – Will place your cursor in the context filter (search bar) Now, type in anything to search Clients, Projects and Labels. Use the arrow keys to choose your desired match. Press [Enter] to select, or [Backspace/Delete] to remove items from the filter.
- [Crtl]+[Enter] – Will place your cursor in the Task adder. Type in your task then press [Enter] to quickly add a task. Or, press [Shift]+[Enter] to add more details to the task. To modify the more advance task settings, press [Ctrl]+[Enter] after you finish typing in your task.
READ NEXT:
Learn more about todo.vu’s unique context filter to find tasks, as well as other unique features for finding tasks and efficiently managing your workflows. Read here >>


