
Tracking time: advanced
In todo.vu, you can track your time in real time at any billing rate, using the built-in timer. Whenever time is tracked, todo.vu automatically creates a time entry as a detailed record of that activity.
This lets you see exactly who worked on what, when, and for how long, as well as the dollar value of that time. You can then use todo.vu to compile all this information into clear, easy-to-read reports for your clients and for yourself.
In this Help article, you’ll learn how to create time entries manually to record time after the fact. You’ll also learn how to edit time entries, set time budgets, and record time manually on behalf of other team members.
To learn how to track time with the built-in timer, please see our Tracking Time: the basics Help article first.
In this Help article, we’ll cover:
- Recording time spent manually
- … on a task
- … on the calendar
- Using todo.vu’s Time modal
- Why track time to tasks
- Editing tracked time
- Deleting tracked time
- Charging the right rate for your tracked time
- Admin-only features
- Setting the time budget for a task
- Setting the time budget for a project
Quick glossary
Time entry– A time entry is a detailed record of time that has been logged in todo.vu, either tracked in real time with todo.vu’s timer, or recorded manually. Time entries can be displayed on the calendar, on individual tasks, and in your reporting dashboards.
Floating time entry – A floating time entry is a record of time that has been logged in todo.vu, but which is not yet connected to a specific activity (a todo.vu task).
Time modal – The Time modal is a pop-up modal that enables users to create or modify a time entry.
Calendar entry – An entry on todo.vu’s calendar can be an actual time entry, billed time entry, predictive time entry, due date, or reminder.
Task assignee – A task assignee is the user who is responsible for the task. By default, the person who creates the task is the assignee; however, you can delegate tasks to others by adding them as assignees. There can be only one assignee on each task.
Recording time spent manually
Often, you will use todo.vu’s timer in real time while you work. However, there will be instances when you will need to record your time manually; if you forget to use the timer in the first place, for example.
When you record time manually, you’re creating a time entry yourself, instead of having todo.vu create it automatically via the timer.
You can create a time entry manually in two ways:
- via a todo.vu task
- via the calendar.
We’ll go through each of these methods below.
1. Record time manually via a todo.vu task
Using the ‘Time spent’ button at the top right of an open task, or the timer icon below the task’s comment editor, you can manually record time directly on the task.
Both options will open a pop-up window, which you will use to create your time entry.
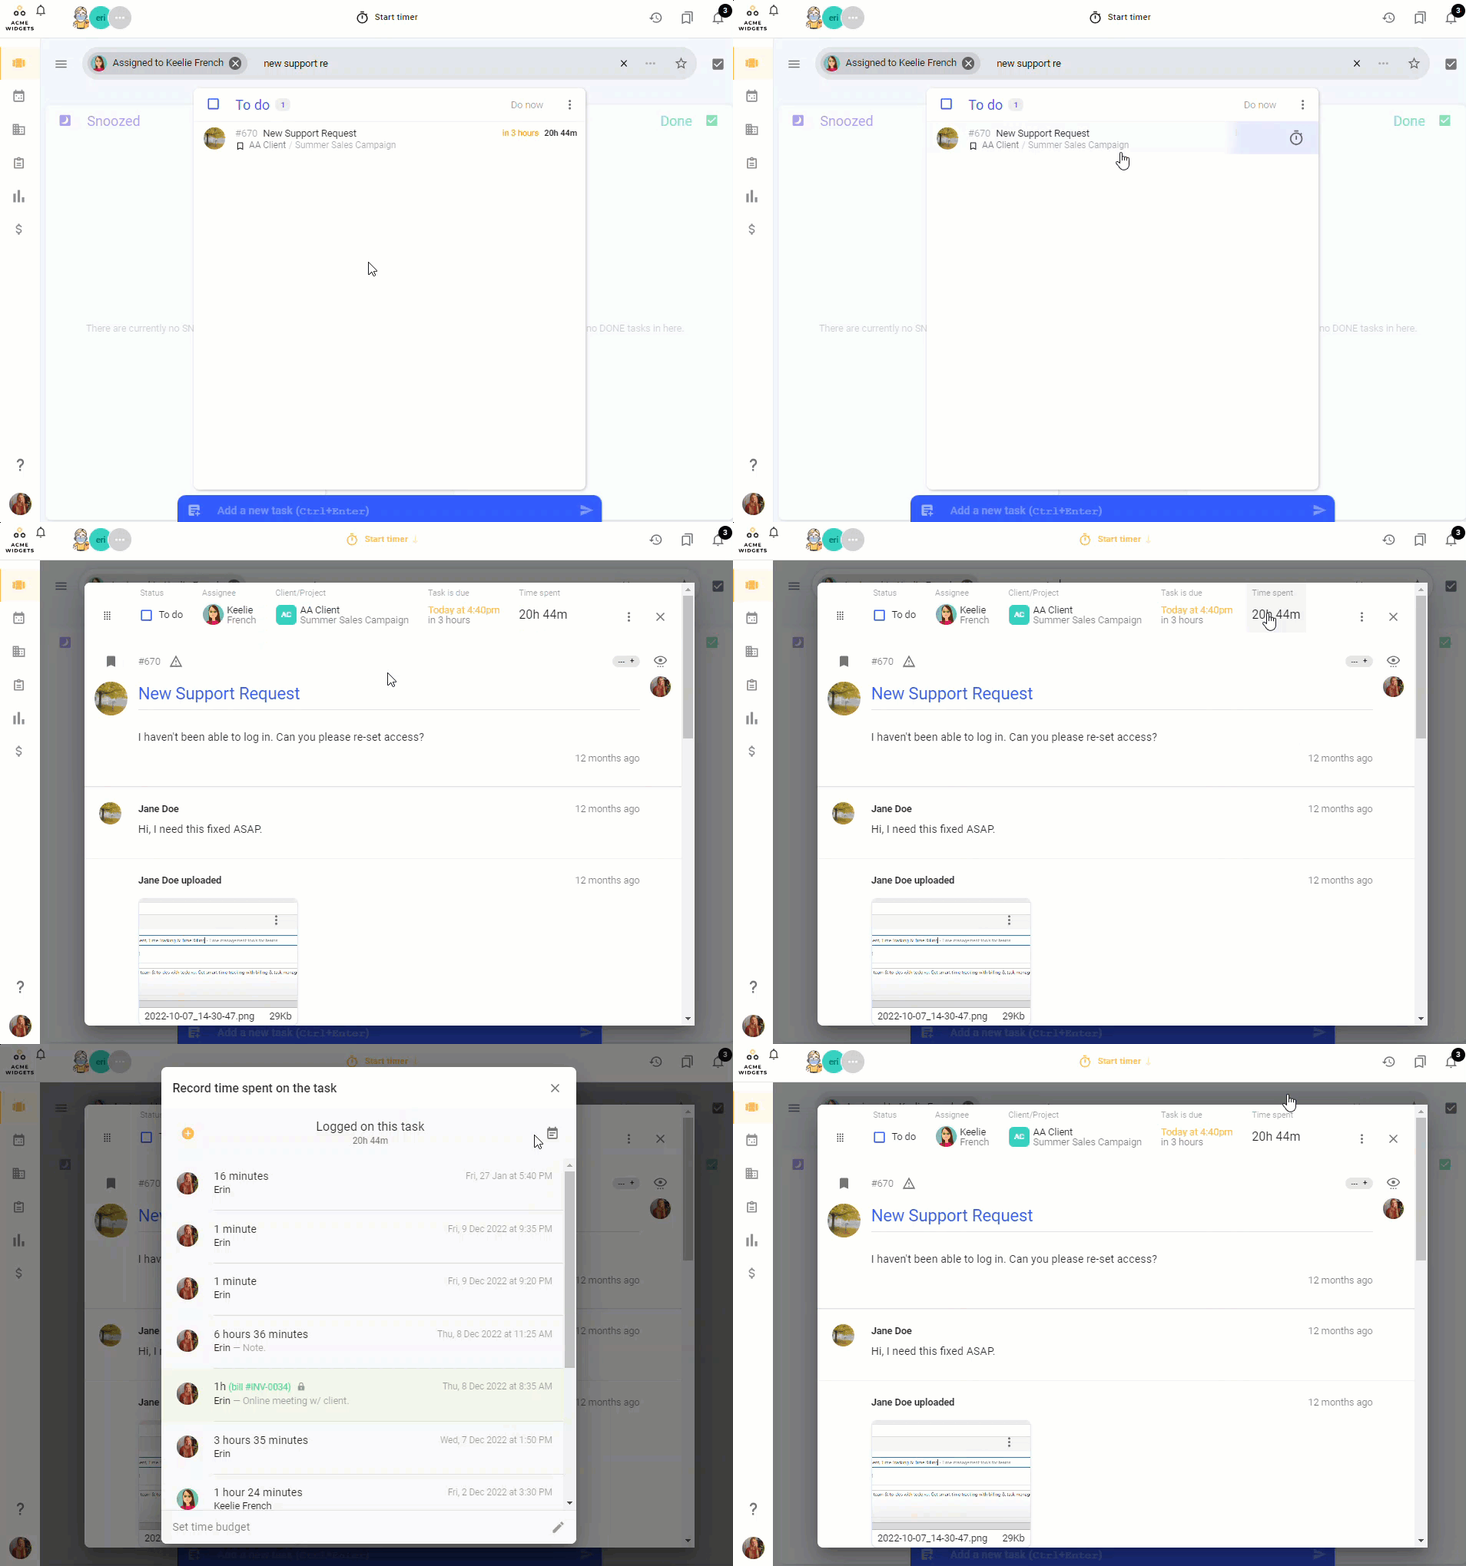
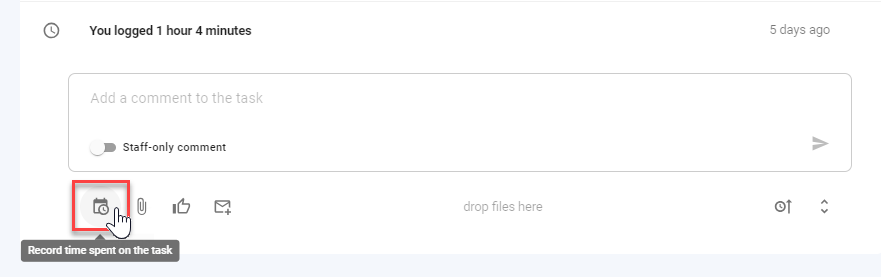
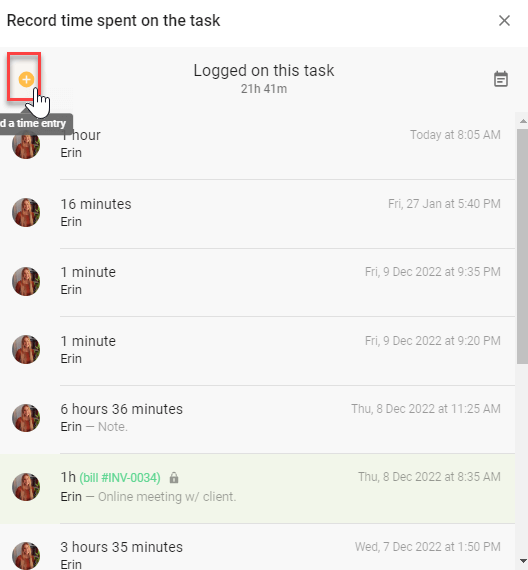
On this pop-up window, you can select the (+) sign on the left or the calendar icon on the right to create your time entry.
(+) icon
If you click on the (+) icon, you will open todo.vu’s Time modal.
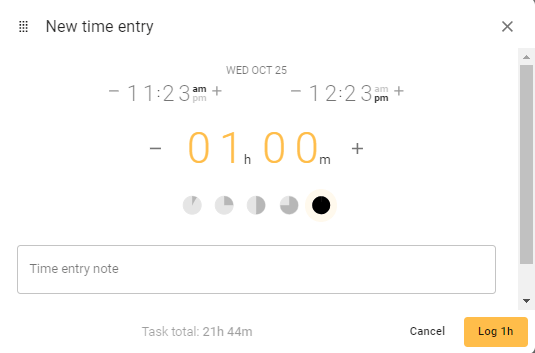
On the Time modal, you can create your new time entry to record time spent on the task.
Learn more about using the Time modal below.
Calendar icon
If you click the calendar icon, you will see the Timeline view in the window.
This view displays the current day in hourly increments with all calendar entries that relate to your user, not just those relating to the specific task you have open.
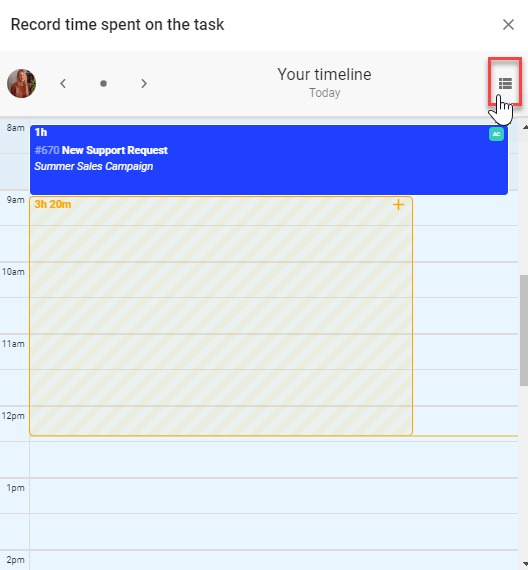
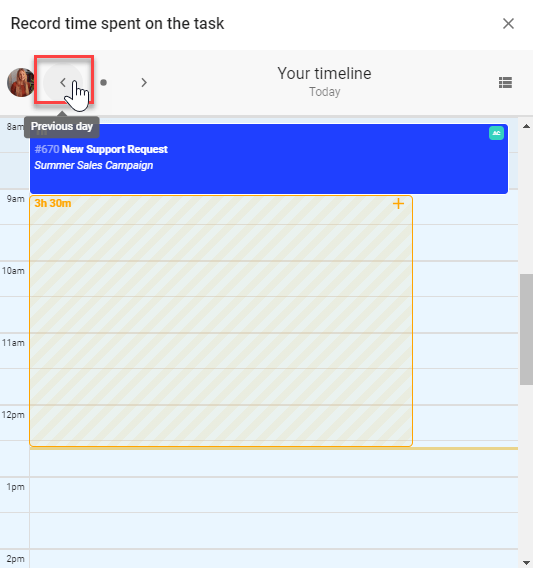
Like on todo.vu’s primary calendar, you can navigate and add time entries to previous and future days with the left and right arrows at the top left of the window, with the dot returning you to the current day.
To add a time entry to the task from your timeline, click anywhere on the calendar. This will open todo.vu’s Time modal, where you can create your time entry.
Learn more about using the Time modal below.
2. Record time manually on the calendar
You can access todo.vu’s Calendar by selecting the clock icon on the left sidebar on your Workspace. Here, you can create manual time entries on any of the different Calendar views.
Select your view with the symbols on the top right-hand side of the Workspace, either:
- Agenda (A)
- Rolling Day (1/3/5/7/9)
- Week (W)
- Month (M)
- Year (Y)
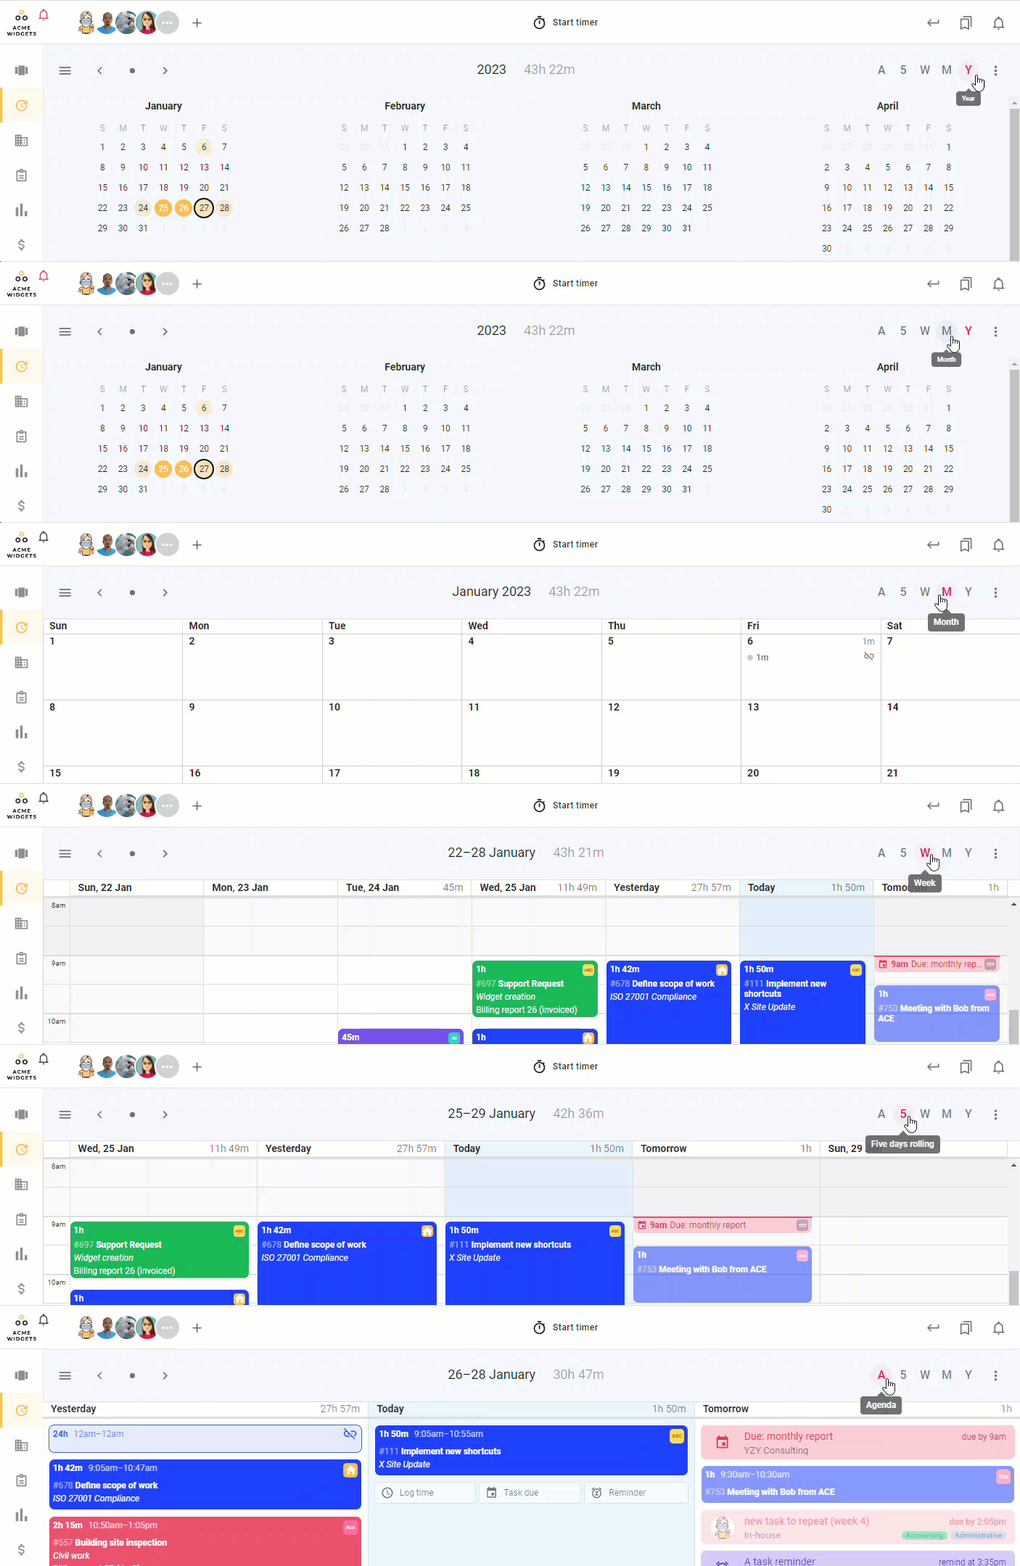
To create time entries on each of the different views:
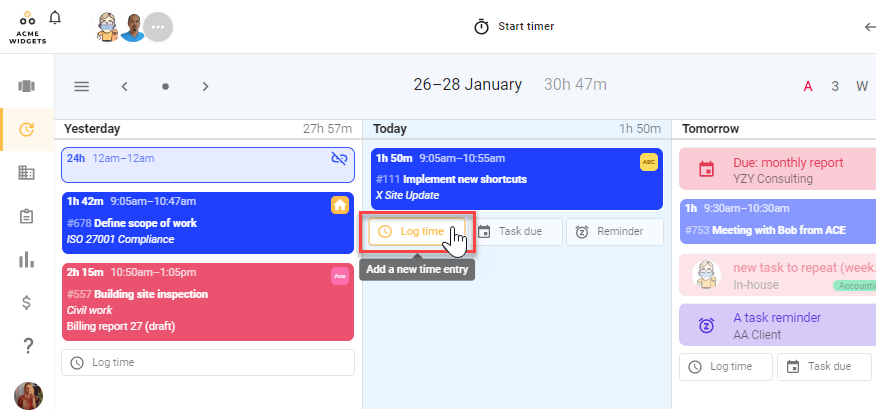
On the calendar’s Agenda (A) view, select ‘Log time’ below the existing calendar entries (if any) on the desired day.
This will open todo.vu’s Time modal, which you can use to create your time entry.
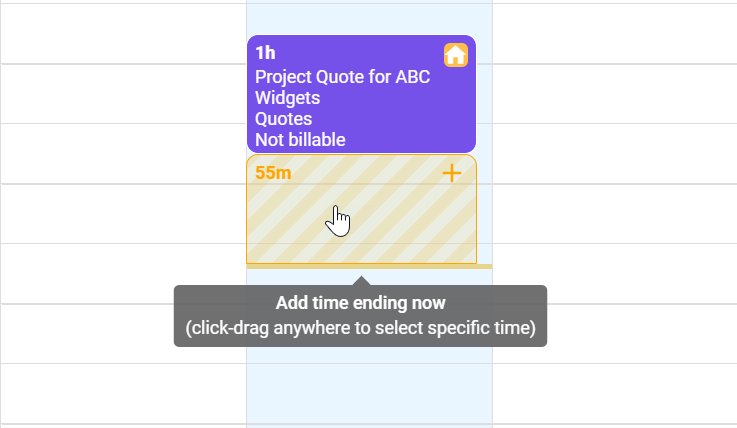
On the calendar’s Rolling Day (1/3/5/7/9) or Week (W) views, click on a desired date and time, or on todo.vu’s predictive time feature.
This will open todo.vu’s Time modal, which you can use to create your time entry.
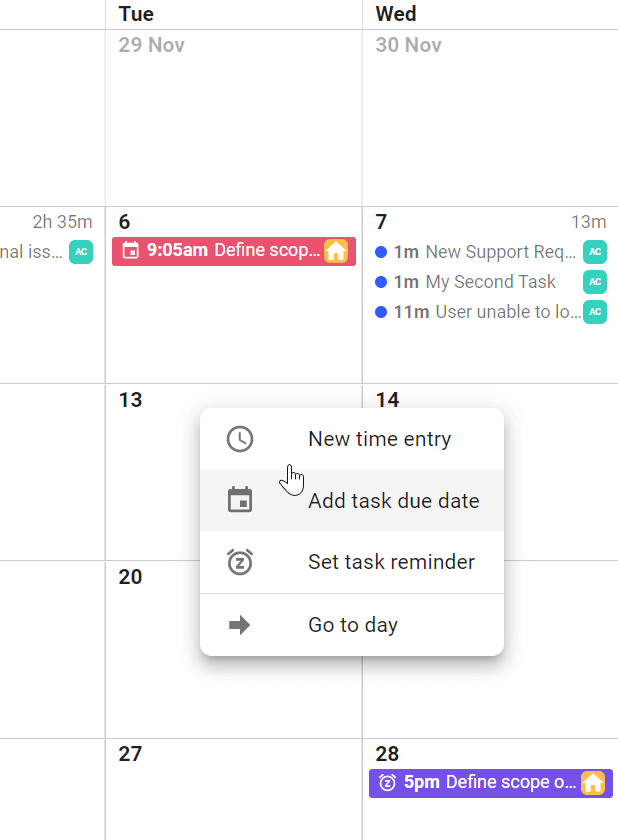
On the calendar’s Month (M) or Year (Y) views, right click on your desired day, and select ‘New time entry’ from the drop-down menu.
This will open todo.vu’s Time modal, which you can use to create your time entry.
Note that todo.vu allows you to record multiple time entries to one task.
This means:
- any number of team members can log their own time entries to the same task, even if their time entries overlap.
- a single user can record multiple time entries on the same task; for example, each time they start and stop the timer, or if they manually record time later.
todo.vu’s ‘Time modal’
To create and edit time entries in todo.vu, you will use the Time modal.
Options on the Time modal update dynamically depending on your workflow: whether you are creating or editing a time entry, including editing a time entry that still has its timer running.
However, its primary function is the same: to create and edit your detailed time records.
Using the time modal
On the Time modal, you can:
- adjust the duration of a time entry
- add notes to a time entry
- discard the a entry
- stop/start the timer on a time entry (stop timer option only available if the time entry’s timer is still running)
- connect tasks (and therefore clients/projects) to a time entry, if it’s a floating time entry.
Here’s how:
1. Adjust the duration of the time entry
You can adjust your time entry by:
- selecting the plus and minus signs on either side of the hours and minutes.
- selecting any number on the Time modal and using the up/down arrows on your keypad to increase or decrease the number, or inserting numbers from your keypad.
- selecting the time disks underneath the time duration.
You can do this as you’re creating new or editing existing time entries, as well as on time entries that still have their timer running.
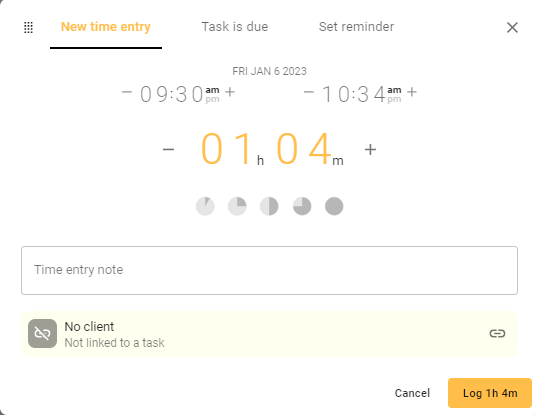
2. Add notes to the time entry
You can add notes to a time entry on todo.vu’s Time modal under the time entry duration. You can edit time entry notes at any time, from when the timer is running to when you are creating your billing report.
Time entry notes appear on your billing reports to provide your clients with even greater transparency.
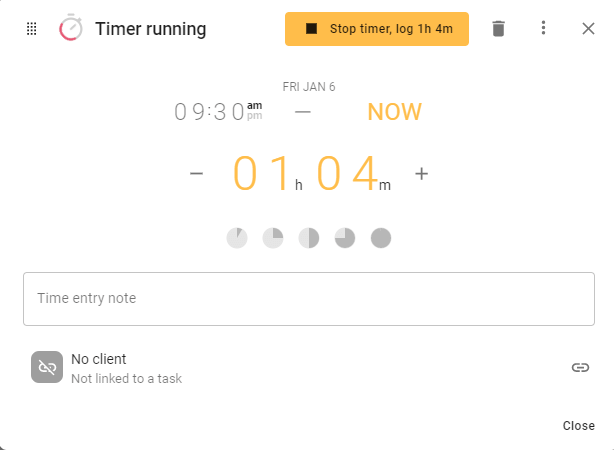
3. Delete the time entry
Using the Bin icon or three-dot menu on todo.vu’s Time modal, users can discard their time entry.
You can do this on existing time entries, as well as on time entries that still have their timer running, but not while you are creating a new time entry, as that time entry is not yet live.
4. Stop the timer/Log time and continue
Note: This option is only available on the Time modal for a time entry on which the timer is still running.
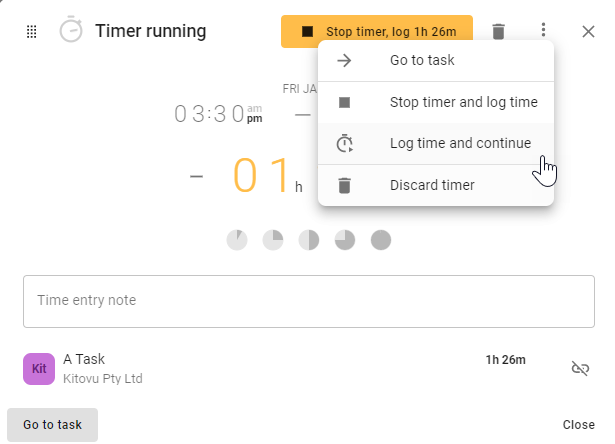
Apart from the primary Stop timer button that appears on the Time modal, you can also stop your timer by selecting the three-dot menu at the top right of the modal and selecting ‘Stop timer and log time’.
You can also select ‘Long time and continue’. This will automatically stop and restart the timer (on the same task, if one is connected), allowing you to record more specific time entry notes to your tracked time in increments.
5. Connect the time entry to a task
You can connect a running timer to a task at any time. You can also change a time entry’s connected task to a different task (or no task) at any time.
Here’s how.
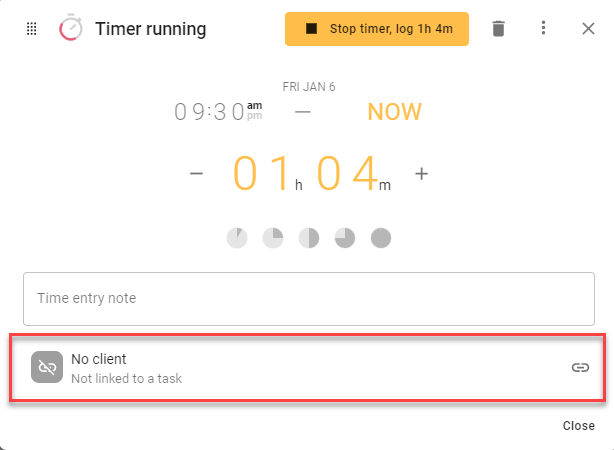
a) Click on the ‘No client – Not linked to a task’ field (or the connected task)
You can also click the link icon that appears to the right on this field.
If your timer is already connected to a task, you’ll see that task’s details in this field instead. Click on this field, and follow the steps below to connect the time entry to a different task. To remove the task, click the unlink icon at the right.
b) Select an existing or create a new task
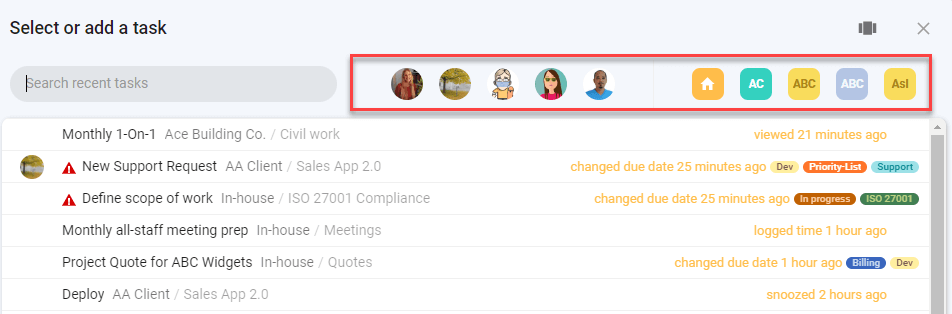
A separate ‘Tasks’ modal will open. Here, you can search for and select an existing task, or create and select a new task.
Use the tabs at the top right, the ‘Your recent tasks’ and ‘All tasks’ to search for and select an existing task. You can use the search bar in both views, as well as the client and user icons in the Recent tasks view.
c) To create a new task
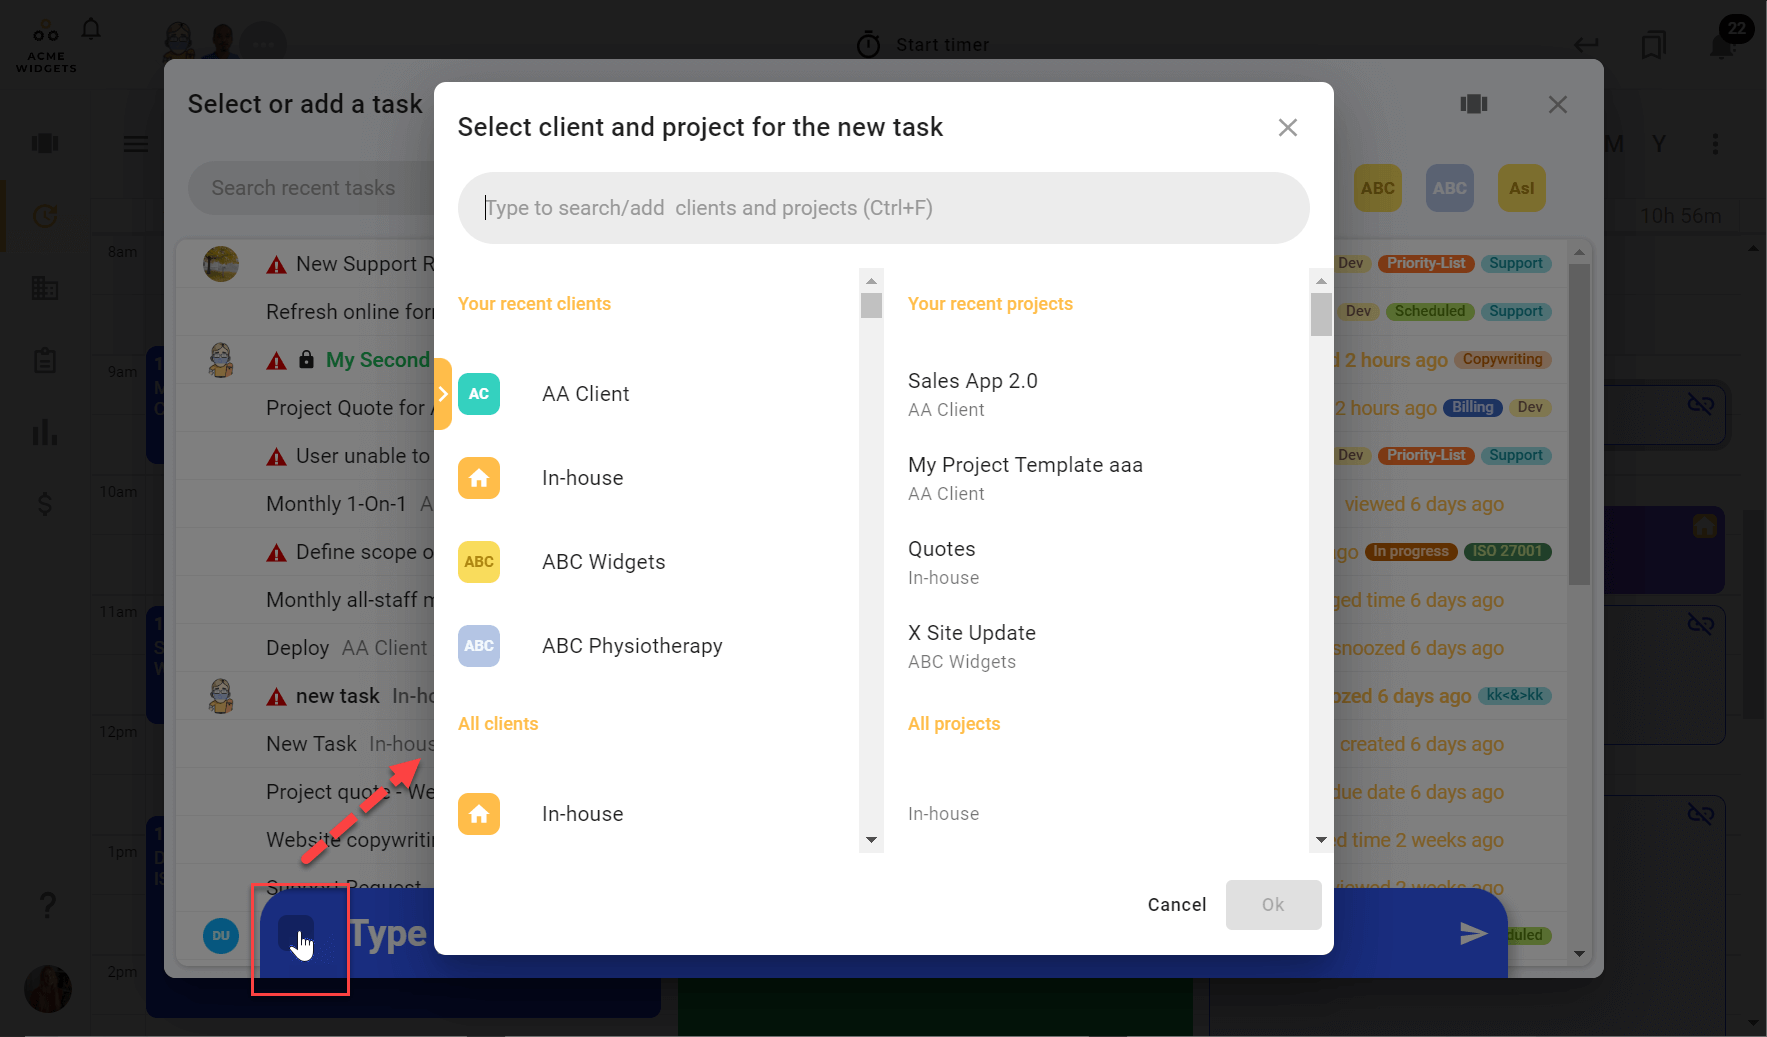
Simply enter your new task’s title in the blue task adder bar at the bottom of the Tasks modal.
Add a client and a project by selecting the field to the left of your new task’s title. Select the right arrow on the task adder bar to finish creating your new task.
Why connect the timer to a task?
Tasks, time tracking, and billing — and how these work together — are central to how todo.vu helps you manage and bill for client work.
If you want time data to show up in your billing reports, then time data must be connected to tasks. That means you must track your time directly on your tasks, either in real time or manually by adding time entries to your tasks.
Why? Because todo.vu calculates time billing totals and itemizes billing reports by billable time on tasks, so it’s easy to see in detail where time was spent, as well as the value of that time.
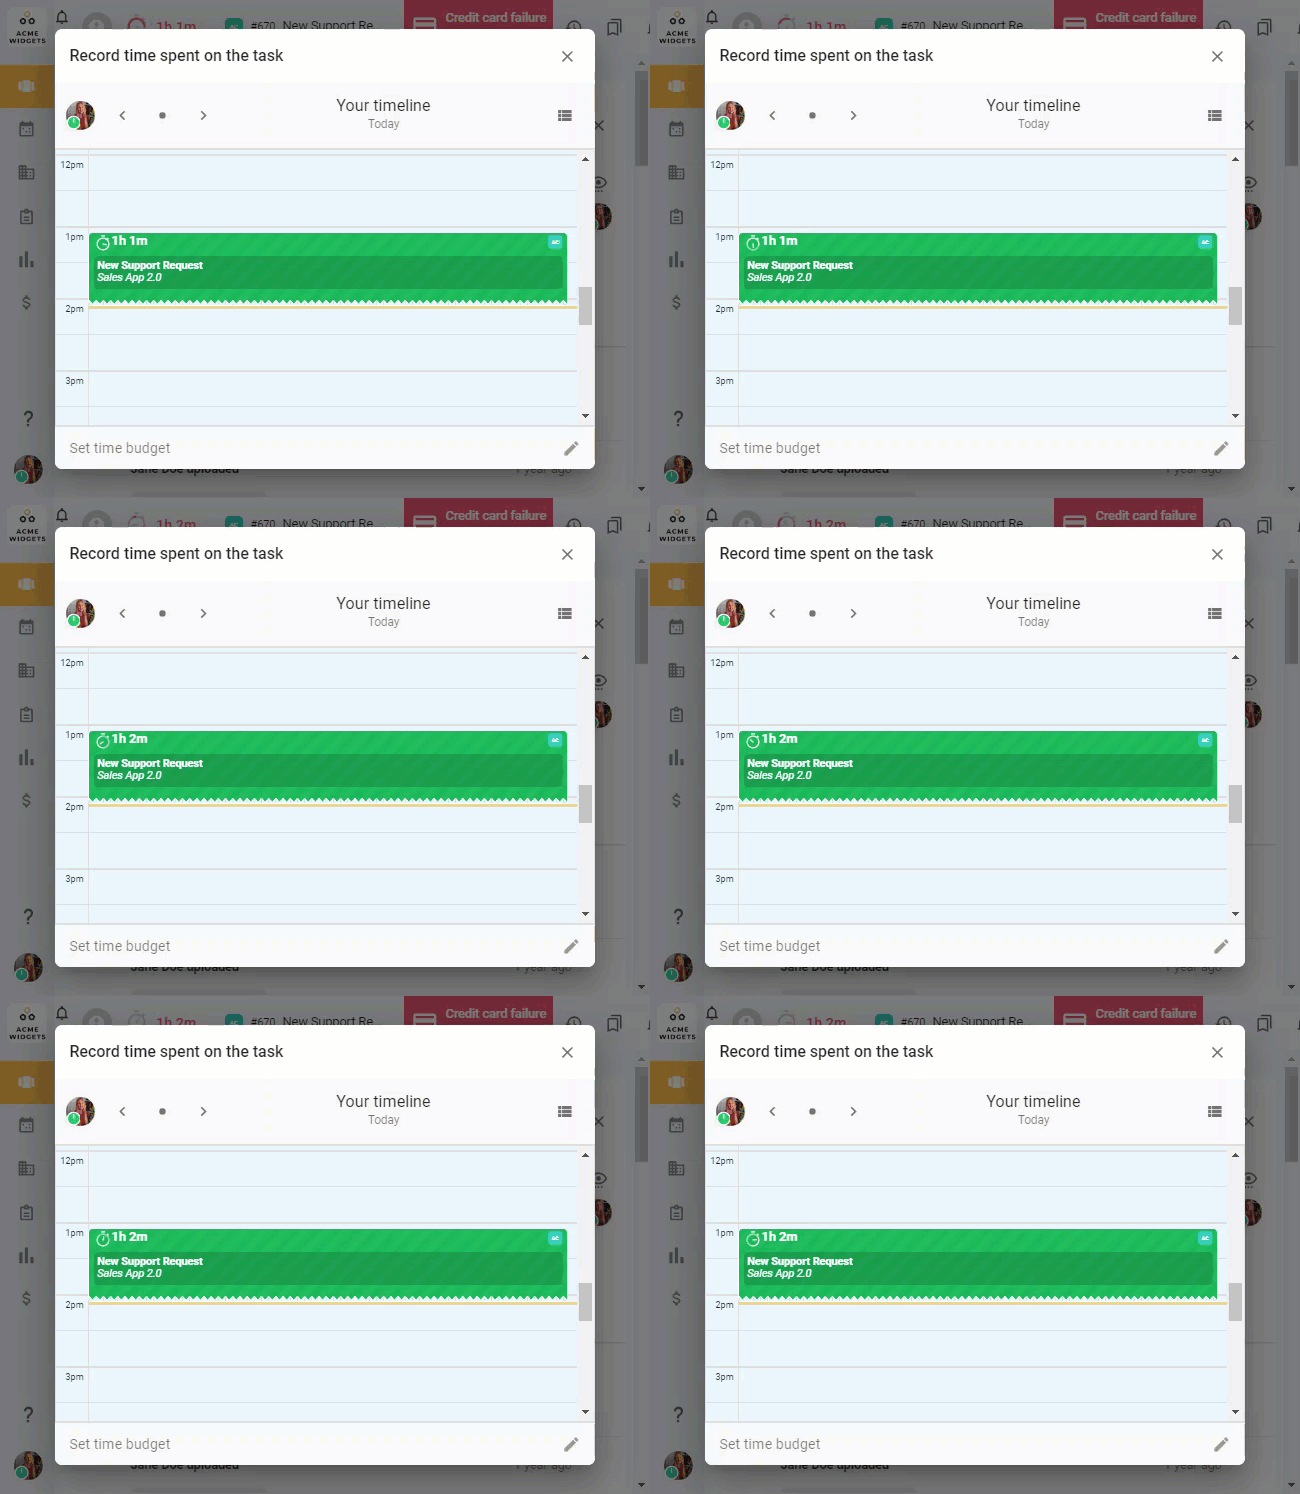
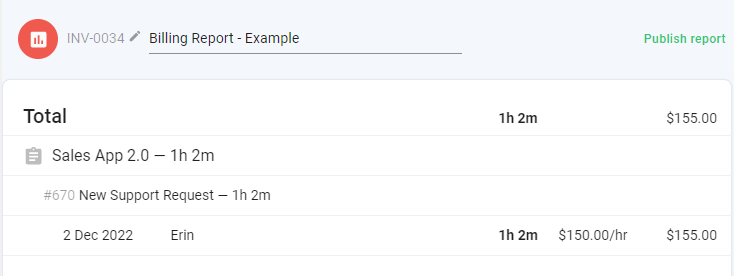
For example, in the following animation, time is being tracked in real time on a specific task, that task titled: ‘New Support Request’, for a project ‘Sales App 2.0’. Then, in the screenshot, that time appears accurately in todo.vu’s billing reports, calculated as per a user-set billing rate: $150 per hour.
This integration saves you from using separate time tracking, billing and task management systems.
Editing time entries
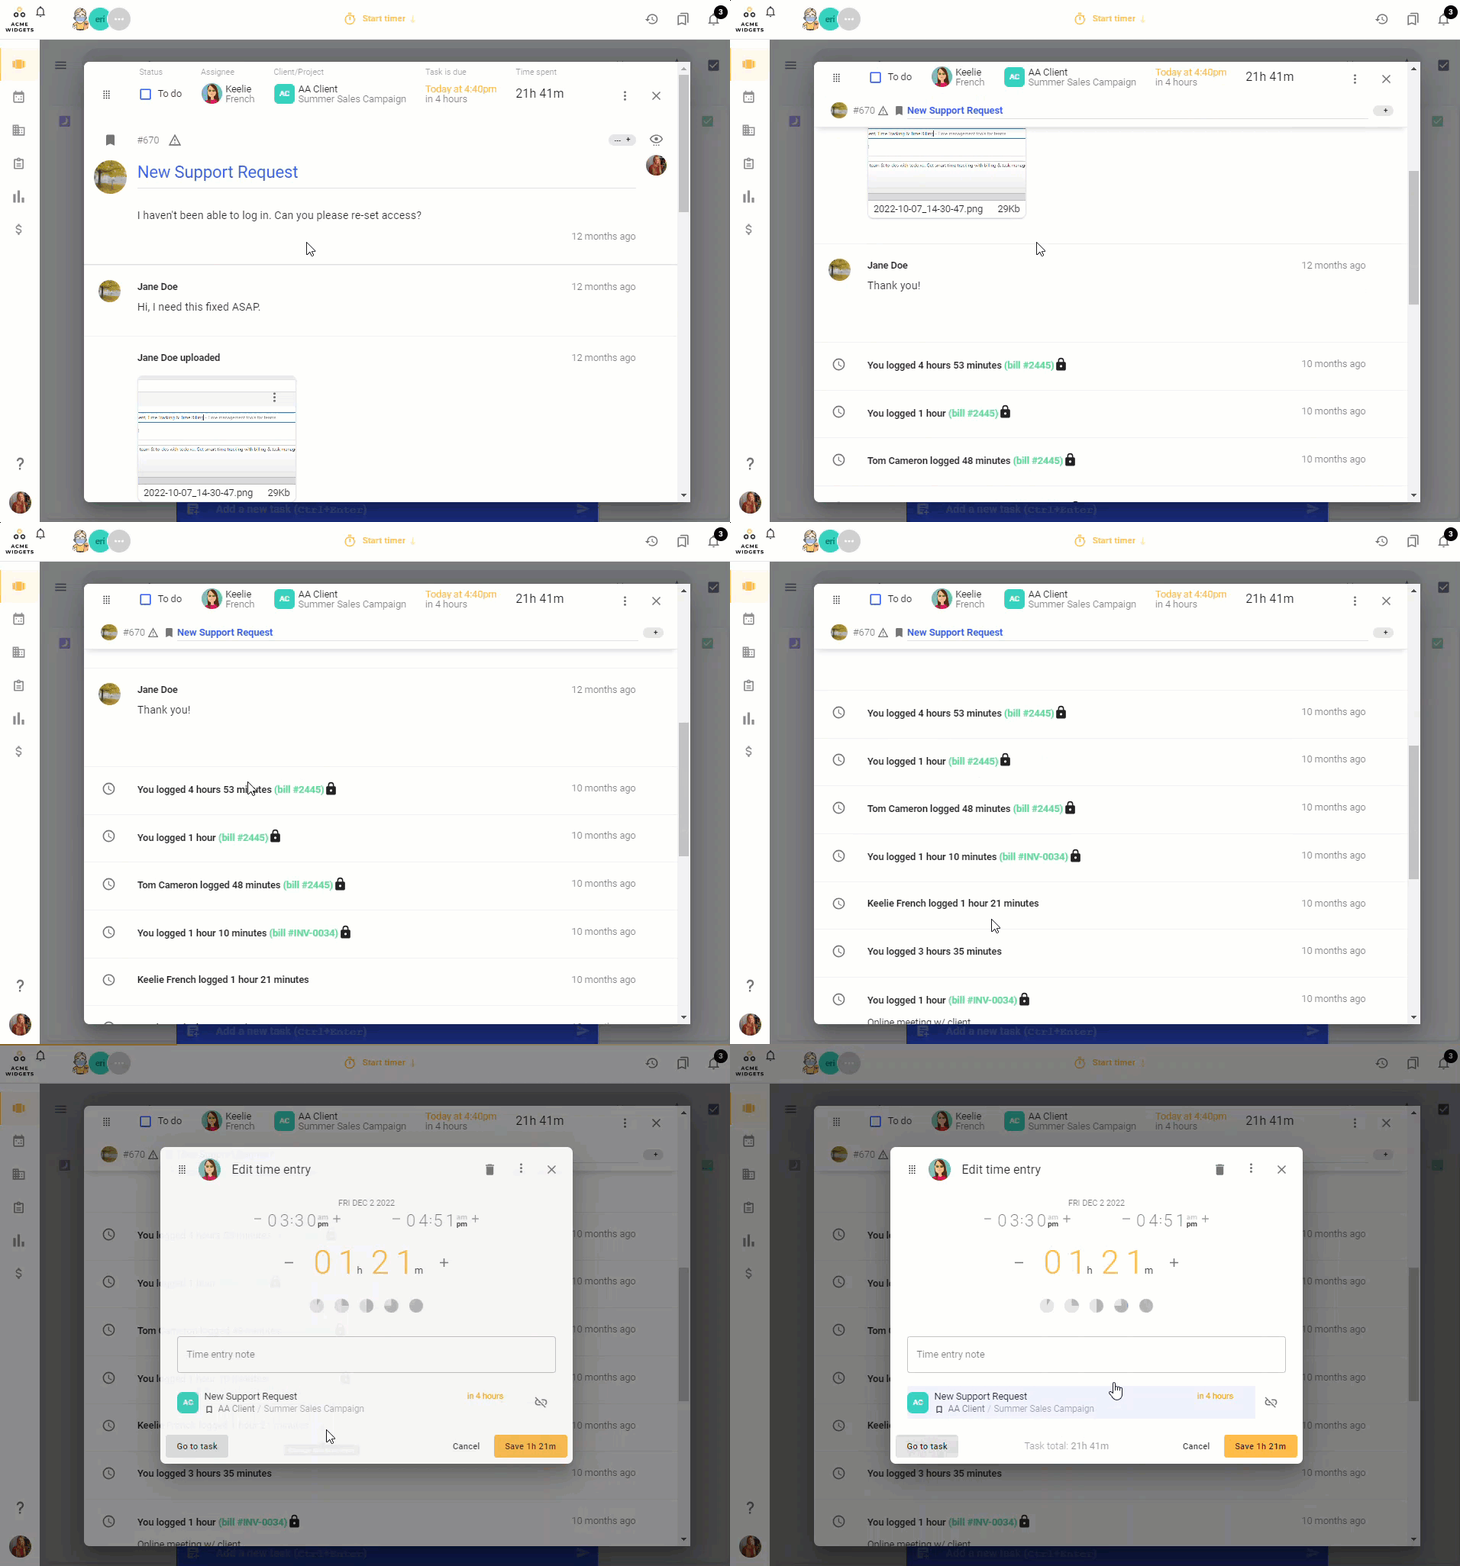
You can edit existing and running time entries in your Workspace using todo.vu’s Time modal.
To edit existing time entries:
- select the time entry on todo.vu’s calendar, or
- select the time entry from a task’s activity timeline, beneath the task’s description. Use the pencil icon to the right of the time entry log that appears as you hover your mouse over it.
This will open the Time modal for editing.
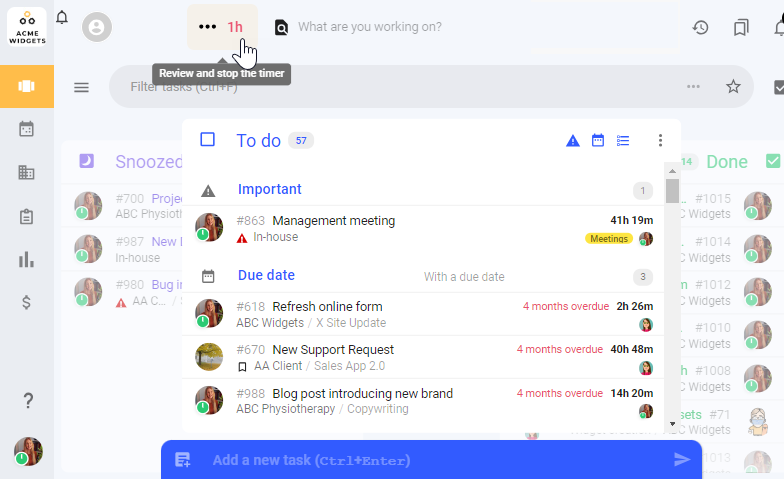
To edit running time entries:
- click the task details (or the What are you working on? field) next to the running timer in the Workspace header, or
- click the timer icon when tracking time freely (i.e, not on a task).
This will open the Time modal for editing.
Note:
If you are an Admin user in todo.vu, you will have the option to edit or delete any time entry in the Workspace. (Except time entries which have already been marked as billed, as these are uneditable.)
All other users have the option to edit or delete their own time entries only.
See how to delete a time entry above.
Admin-only features
Additional editing capabilities
Admin users have advanced features for editing time entries.
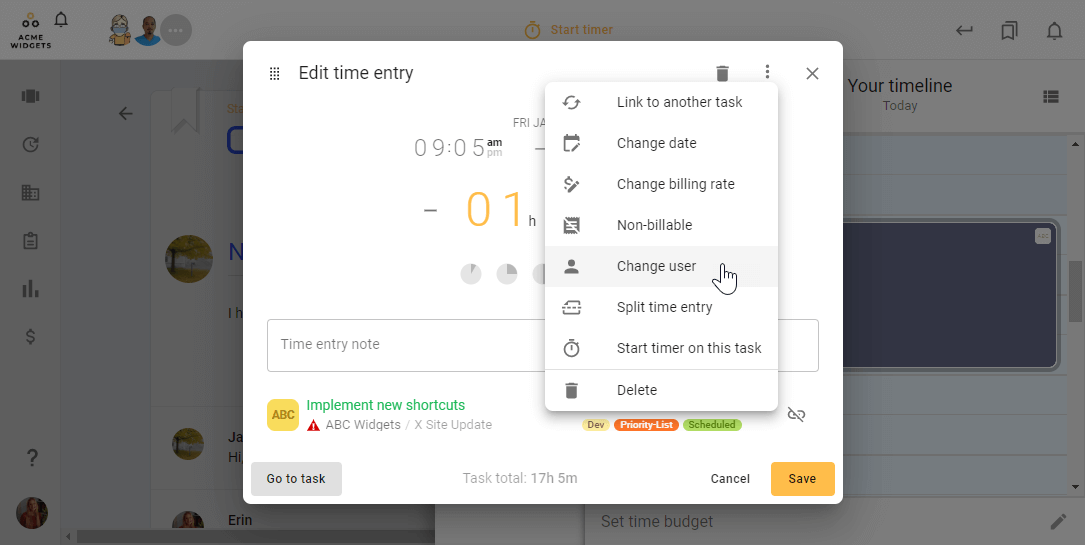
Most importantly, they can:
- edit a time entry’s billing rate (recorded by any user)
- update the user who recorded the time entry
Simply select the relevant option from the three-dot menu on the Time modal while editing an existing time entry, as demonstrated in the following image.
Creating time entries on behalf of other users
If you are an admin user, you can add time entries directly to a team member’s calendar by selecting that team member’s avatar from the hamburger menu at the top left of your calendar, and opening their calendar view.
When you add a calendar entry directly to a team member’s calendar, and that calendar entry is linked to a new task, todo.vu will automatically make that team member the owner of that task (in todo.vu, this is called that task’s ‘assignee‘.)
Note
Team calendar views are persistent; once you select a team member’s calendar view, you will remain on that team member’s calendar until you update the view to either your own or another team member’s calendar.
This includes when you close the browser on your Workspace entirely, and then reopen it later.
Charging the right rate for your tracked time
Time in todo.vu is automatically tracked to your pre-set billing rates as per your settings.
These billing rates includes rates for:
- The entire Workspace: This is the default rate for the entire Workspace; time will be tracked at this rate on all tasks, unless there are overrides, as below. Learn how to set up your Workspace’s billing rate here.
- Projects: This is the rate at which time will be tracked on tasks belonging to a specific project. This will override your Workspace’s default billing rate. Learn how to set up your Project rate here.
- Project Users: This is the rate at which time will be tracked for certain staff users working on a specific project. This will override a project rate and the Workspace’s billing rate. Learn how to set up your Project User rates here.
Learn more about setting up custom billing rates here.
The time budget feature
todo.vu users have the option to set a time budget for certain tasks and projects. Many consultants, for example, will quote a price based on the amount of time they think a task will take.
The time budget can be set from within a task or through the project.
To set a time budget budget for a task:
Open your task, and select the ‘Time spent’ field at the top right-hand side. This opens a pop-up window, where you can set that task’s time budget by selecting the ‘Time budget’ field at the bottom. You can set your time budget by typing in hours and minutes.
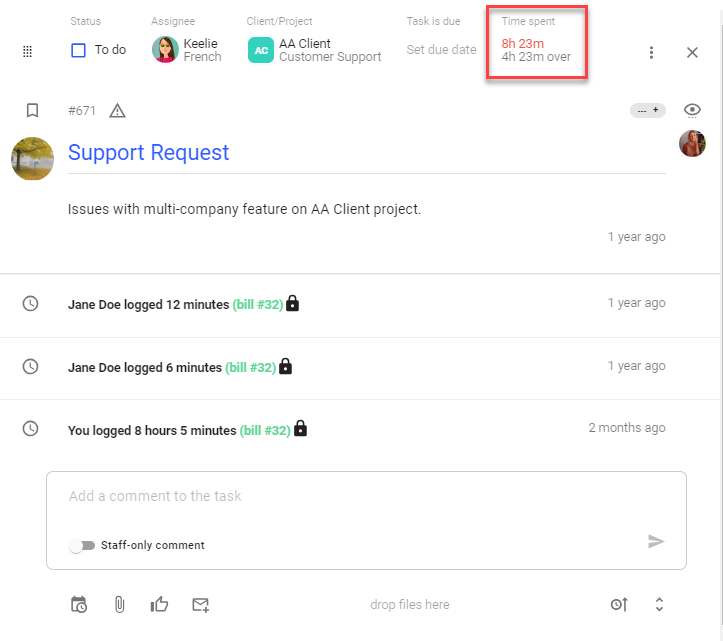
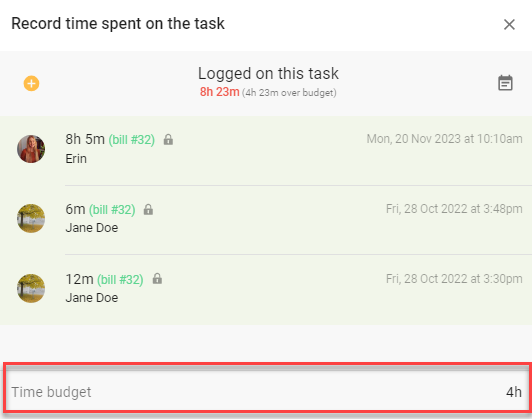
The data shown on your ‘Time spent’ field on the open task page will turn red as you exceed your budget.
In the example above, we are 4 hours and 23 minutes over our time budget for this particular task.
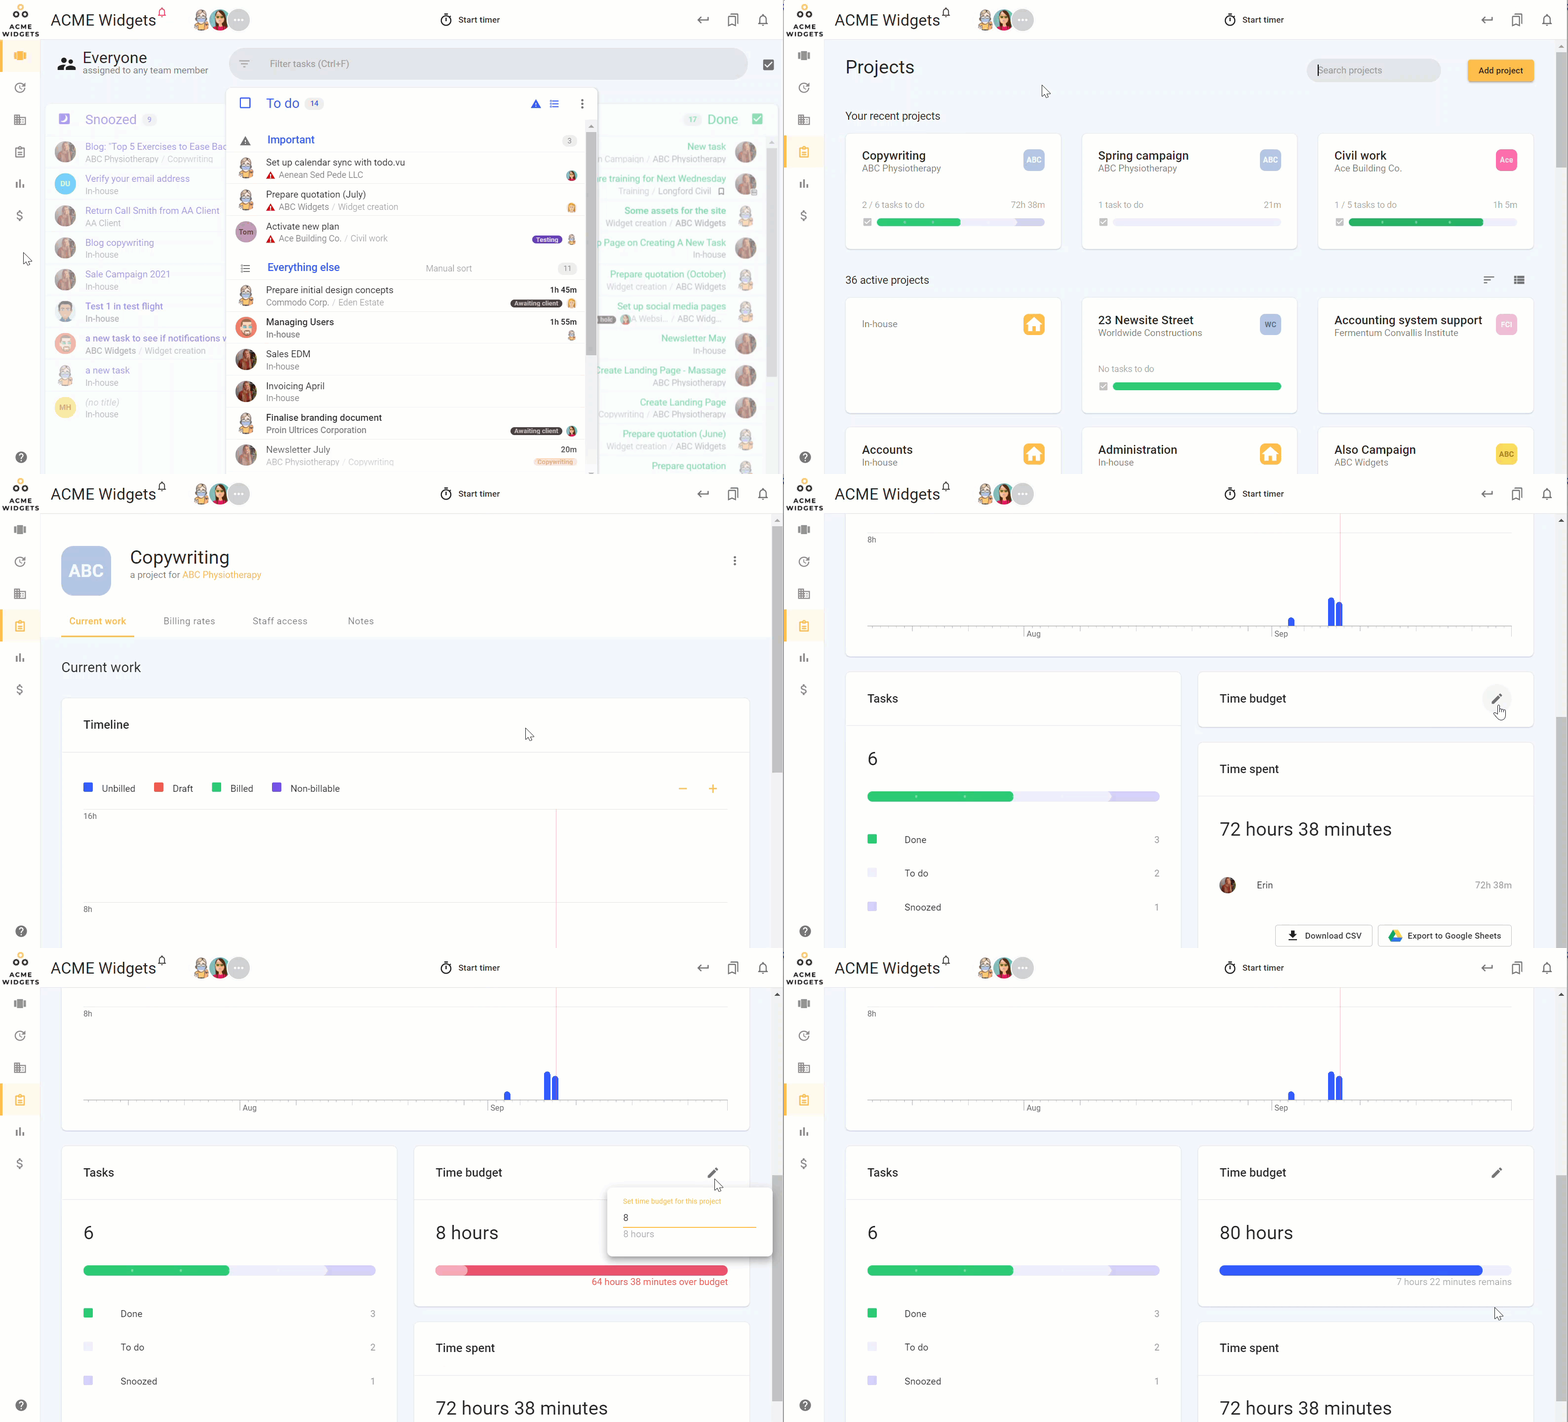
Setting time budget for a project
Navigate to your Project Dashboard by selecting the Projects icon on the left sidebar of your Workspace.
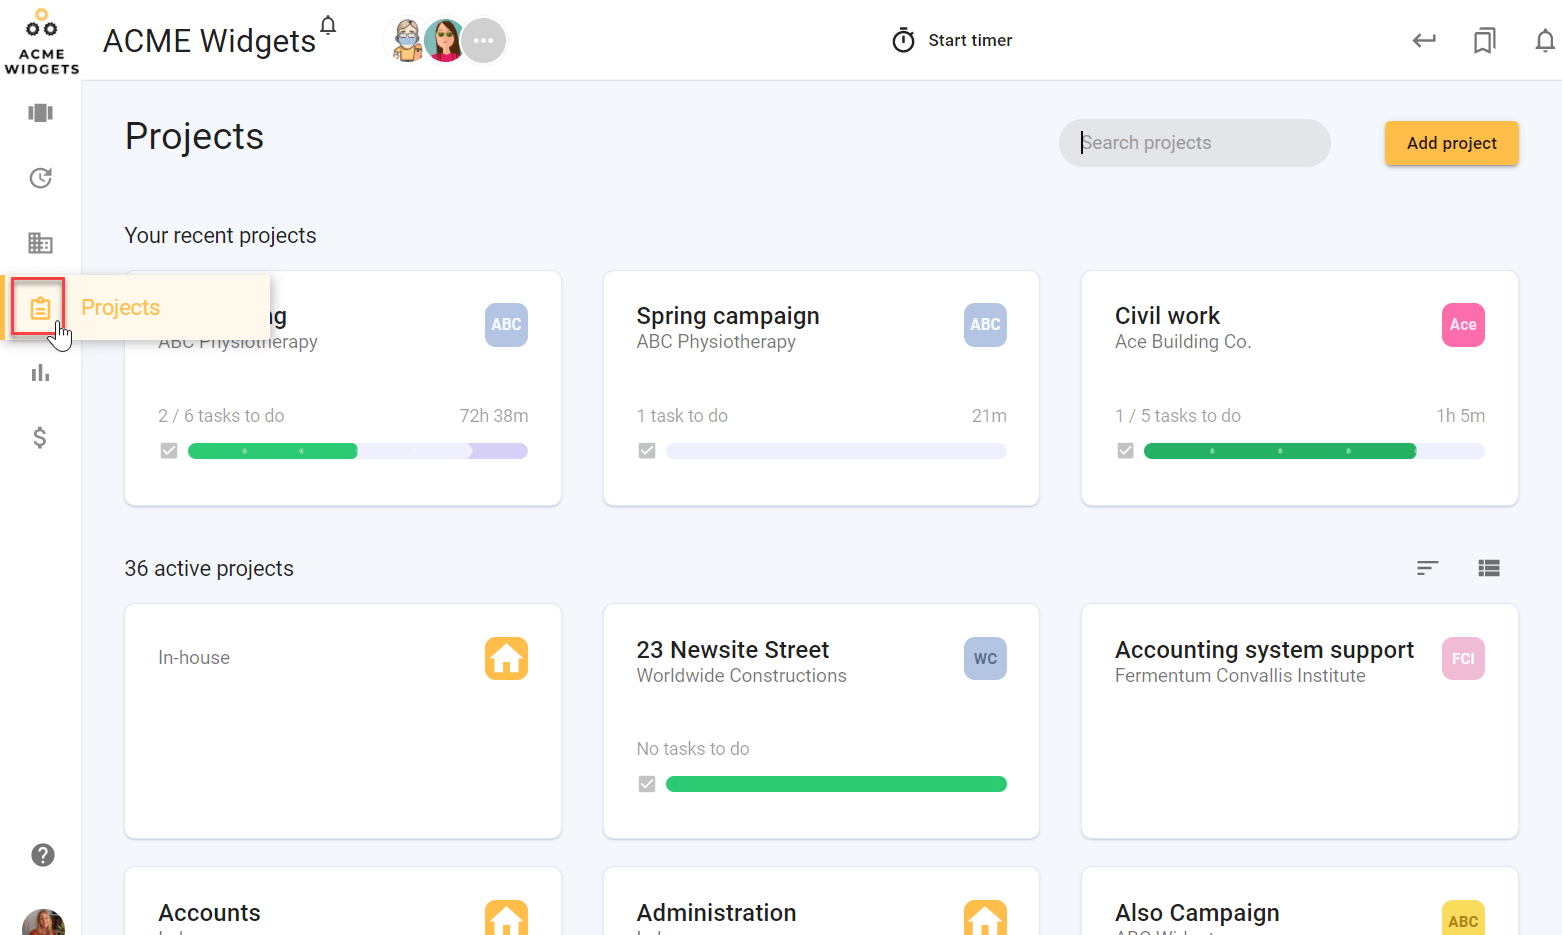
Here, you can add a time budget at a project level.
Select a project to which you would like to allocate a time budget. Scroll to where you see the ‘Time budget’ field. Click the pencil icon to the right of this to input your time budget.
This budget will apply to time recorded on any task belonging to this project.
In the example below, we have set a time budget for 80 hours. That means we have 7 hours and 22 minutes remaining in our time budget for this project.
READ NEXT:
Learn about todo.vu’s Time dashboard (Calendar view). Read here >>