Creating tasks via the todo.vu code API
Connectors are configurable API endpoints for creating tasks. You can create as many connectors as you like. Each connector has its own unique endpoint URL; this is the URL to which data is posted along with a key for security.
Connectors can be configured either to explicitly set task properties and routing or to accept properties from the API post.
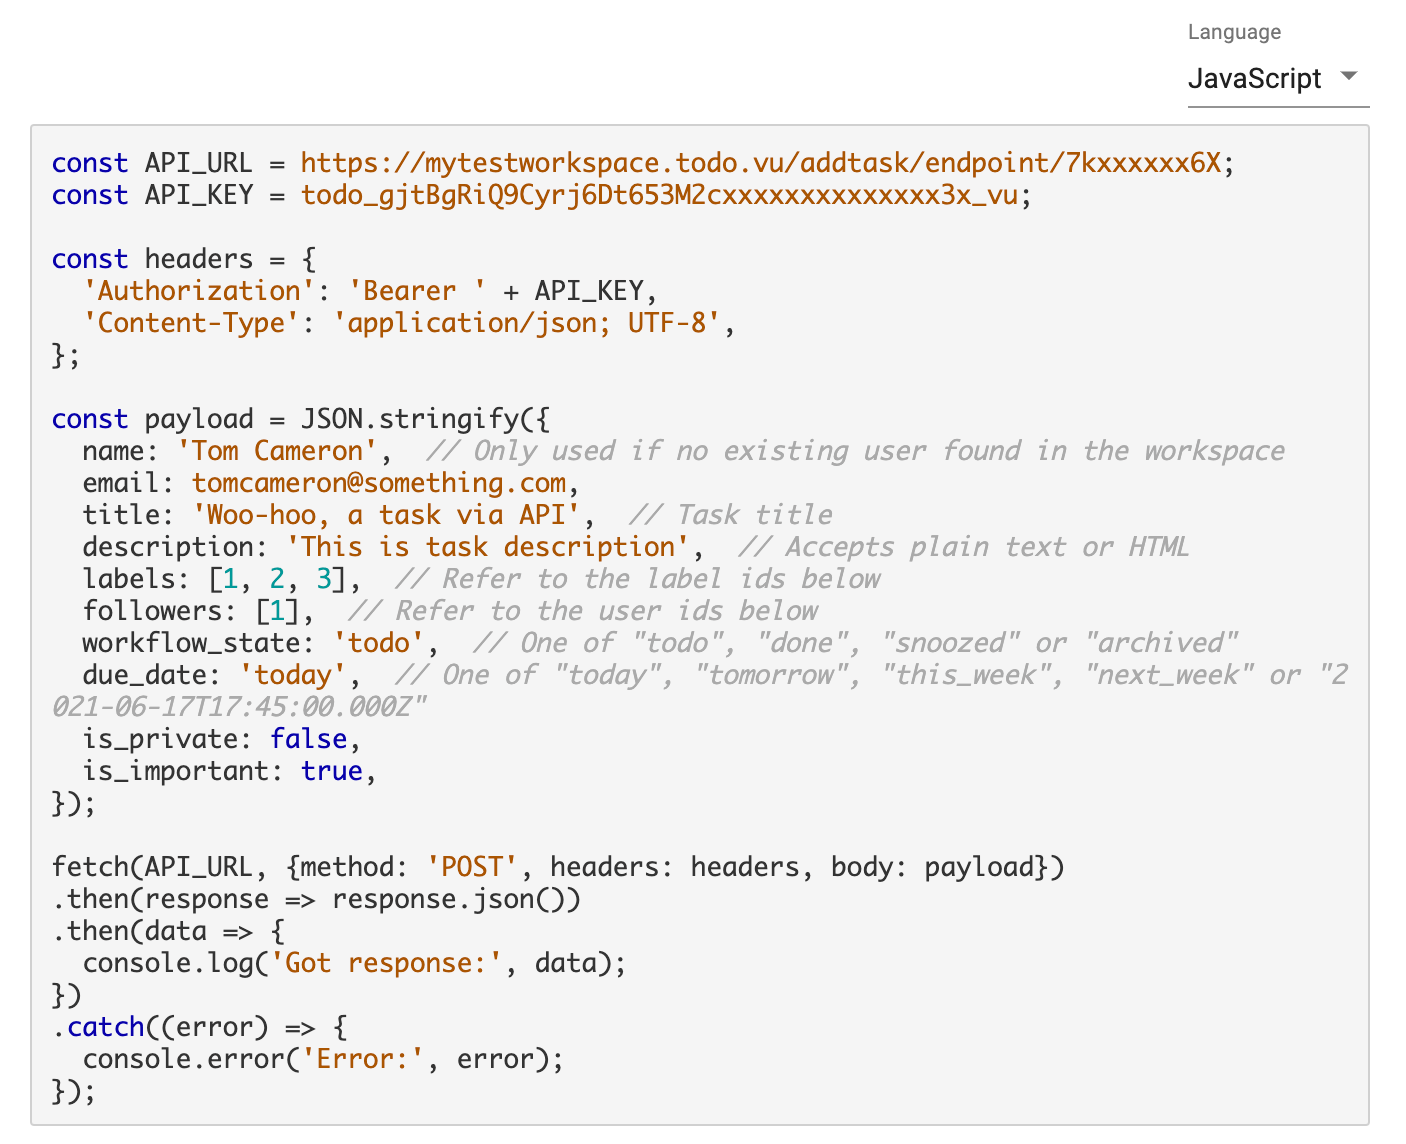
Connectors accept data in an HTTP POST with authentication provided by an Authorization header and data provided in a typical JSON data payload. The response will be in JSON format. If the call is successful, then the response will contain the newly created task ID. If not successful, the response will contain an error message explaining what went wrong.
Managing API connectors
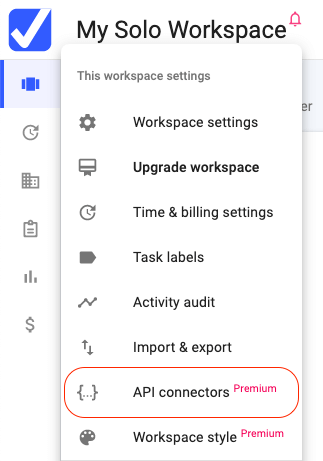
Workspace Admin Users can create and manage the API connectors by clicking on their Workspace name or logo (top left) and choosing the ‘API connectors’ option in the drop-down menu.
Note that API Connectors are a premium feature and are only fully functional on todo.vu’s paid Business Time plan. However, you can create connectors and experiment with them on any plan, so you can get to know how they work. On non-paid plans, connectors are rate-limited to only accept 1 task every 30 hours.
Once you get to the API Connectors page, any existing connectors will be shown as tiles, which you can click on for more details.
You can click on the [Add connector] button to create a new connector.
Configuring connectors
Connectors have three settings tabs: Settings, Code, and Activity.
Settings tab
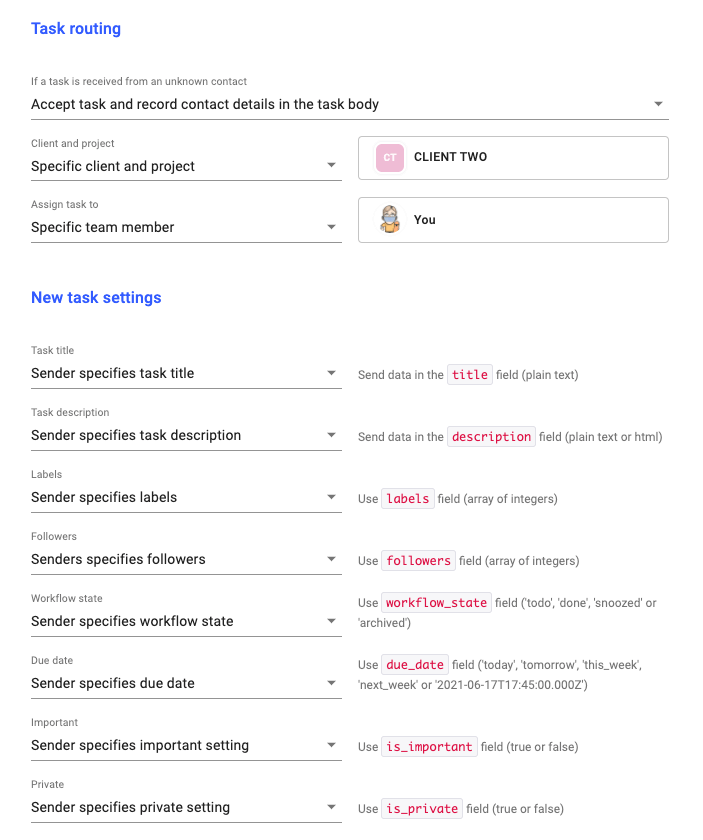
Under the Settings tab, you can configure the connector to either accept specific properties from the data post or preset them within the connector. You can also configure how the task is routed to assignees and categorised by client, project and labels.
Task routing
Deciding on the task creator if the contact is unknown
Because all tasks must have a ‘creator’ within the Workspace, we need to decide how to deal with tasks that come from addresses that are unknown. Connectors can act as users within the Workspace or act on behalf of other users.
So your three options are:
- reject the task entirely
- accept the task and create a new contact based on the information sent
- accept the task but allow the connector to be the task creator and store any contact information on the task.
Client, project and assignee
You can either preset these values on the connector, or you can allow them to be dynamically calculated based on the contact information posted to the connector and default workspace routing rules.
If you do not set these explicitly, then once the task is created and the creator is determined, then the task will be routed to the assignee and client/project similar to how incoming email tasks or tasks from contacts are handled.
New task settings
For all of the task settings, you can either pass them via code to the connector or you can preset them explicitly.
You can set almost any property on a task via the connector settings or the API payload. You can set Labels, add followers, choose the initial Workflow state and even set a due date on the task.
The due date option can be configured to be relative to the task creation date; for example, ‘tomorrow’ would set the due date one day after the task is accepted.
If you set a value explicitly then it can not be passed in the JSON payload; if you try to do so, the task will not be created and it will result in an error.
The benefit of setting values explicitly is that you can modify the settings easily over time. Less programming and decision making is required at the code level.
Code tab
The Code tab will show the connector endpoint URL, which can be changed along with the API key, which can be reset. On this same page, we provide samples of code in JavaScript, PHP and Python.
This code example is dynamic and will vary depending on your connector configuration to help you understand the impact of the settings.
For settings that reference existing data (followers, Labels), you will need to pass the IDs in your code. We provide look-up tools to help you find these values under the Code tab.
Activity tab
On the Activity tab, you can find links to tasks and records created from this connector. This is handy for debugging and reporting activity.
Zapier Zap
We have already developed a new Add-Task Zap in Zapier specifically for the todo.vu task connectors.
The connector provides a full user interface for routing data into a connector, providing integration opportunities with many hundreds of applications.
Suggested usage
It is expected that you would set up different connectors for a range of purposes. You may decide to set up connectors for specific projects or staff, or more generic connectors that are controlled by the API data.
Some suggested use cases include:
Incoming support requests from a web form. In this scenario, you may build a web form on your website which collects information from customers. You then prepare this before posting to a todo.vu connector.
You may choose to explicitly route all tasks to a specific project (in-house/support) intended for incoming requests, and assign them to someone who then delegates the work.
Alerts from automated systems. You may want to develop simple scripts that check your servers for disk space or pending security updates and then generate tasks that are sent to your sys-admin staff to deal with these alerts.
Sales orders from a shopping cart. Similar to the web form but more specific, you may choose to post information in the form of a task directly into todo.vu. For instance, WooCommerce provides webhooks that can be configured to post data to a todo.vu connector.
If the orders require specific actions for the fulfilment, this may be a handy way to automatically notify and delegate and track orders.


