Project Templates
Project Templates simplify the larger scale activities you undertake in business time and time again. Using a Project Template, you can create a series of tasks in todo.vu with just once click. Not only do Project Templates save you time, they help keep you organized as well.
Here’s everything you need to know about Project Templates in todo.vu.
What is a Project Template?
While a Project* in todo.vu represents a collection of todo.vu tasks that are live in a Workspace, a Project Template is a tool that enables a todo.vu user to create, save and use such collections repeatedly.
A user must create a Project Template, and its collection of tasks, only once — when they set it up. Then, every time they use the template, the template’s tasks can be sent live to their Workspace quickly and easily in just a few clicks.
*A ‘Project’ is a term in todo.vu that represents a grouping of tasks, but a Project could be any process, procedure or any multi-step activity. You can customise your Workspace’s naming settings to better suit your business and workflows.
To understand todo.vu’s Project Template, you first need to know that a ‘project’ in todo.vu is how your tasks in todo.vu are grouped and organized.
To make project management easier and time billing clear and precise, the only way a user can track and bill time to a project is through that project’s designated tasks.
This diagram shows that Projects in todo.vu represent a collection of tasks.
Why use a Project Template?
As an expert in your field, you likely have a number of set offerings for your clients. Each will follow a similar process or procedure with a similar set of tasks that need to be completed to get the job done.
If you manage your tasks in todo.vu, this might mean for an oft-repeated project, you set up a task for every single item of work to be completed; for example, a Consultation, Inspection, Quotation and Implementation task. Every time you need to complete the same project, you’ll create these new tasks again.
Now, that’s not overly time-consuming because of todo.vu’s quick-add task or Repeating tasks features, but you might want to take advantage of todo.vu’s Project Templates instead, and simply set up a Project Template that includes the four tasks as task templates.
From that time onwards, you can simply click once on that template to create another four new tasks at once in your Workspace, which you can then customise as you please.
Accessing your Project Templates
You can access your Project Templates, either to create a new template or to use an existing template, from:
a) the main Task Dashboard
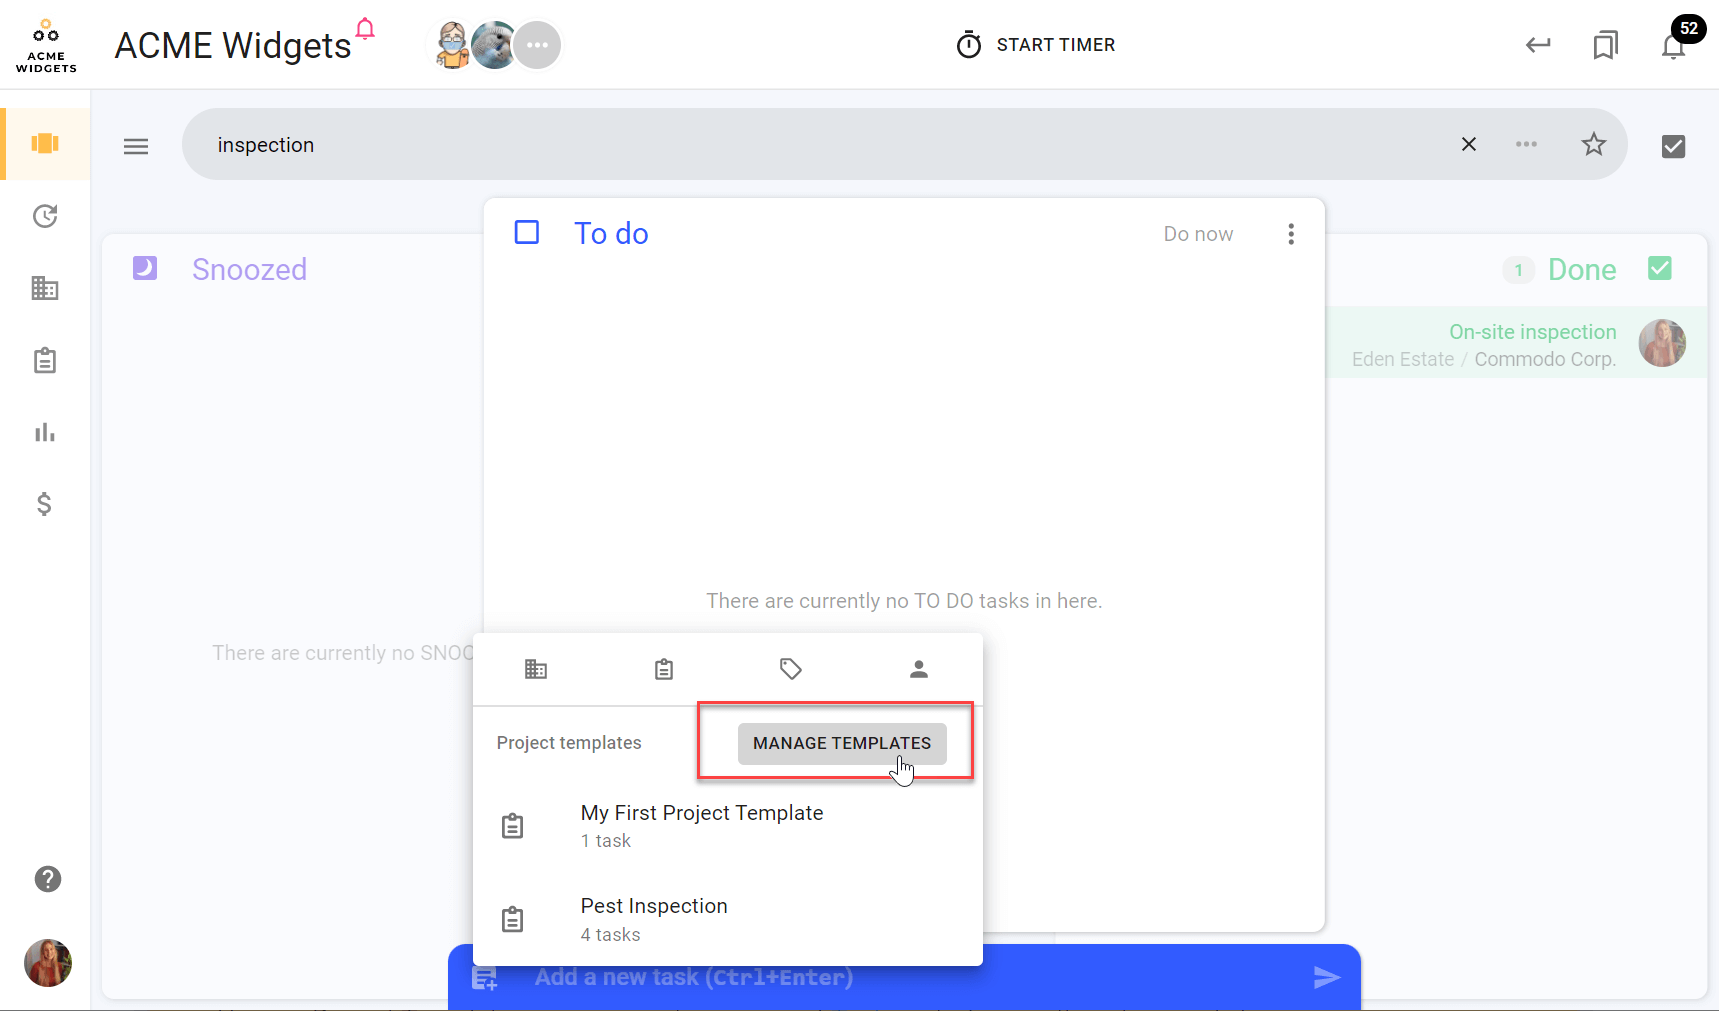
Click the (+) icon on the left of the Task Adder bar at the bottom of your dashboard.
b) the Project Dashboard
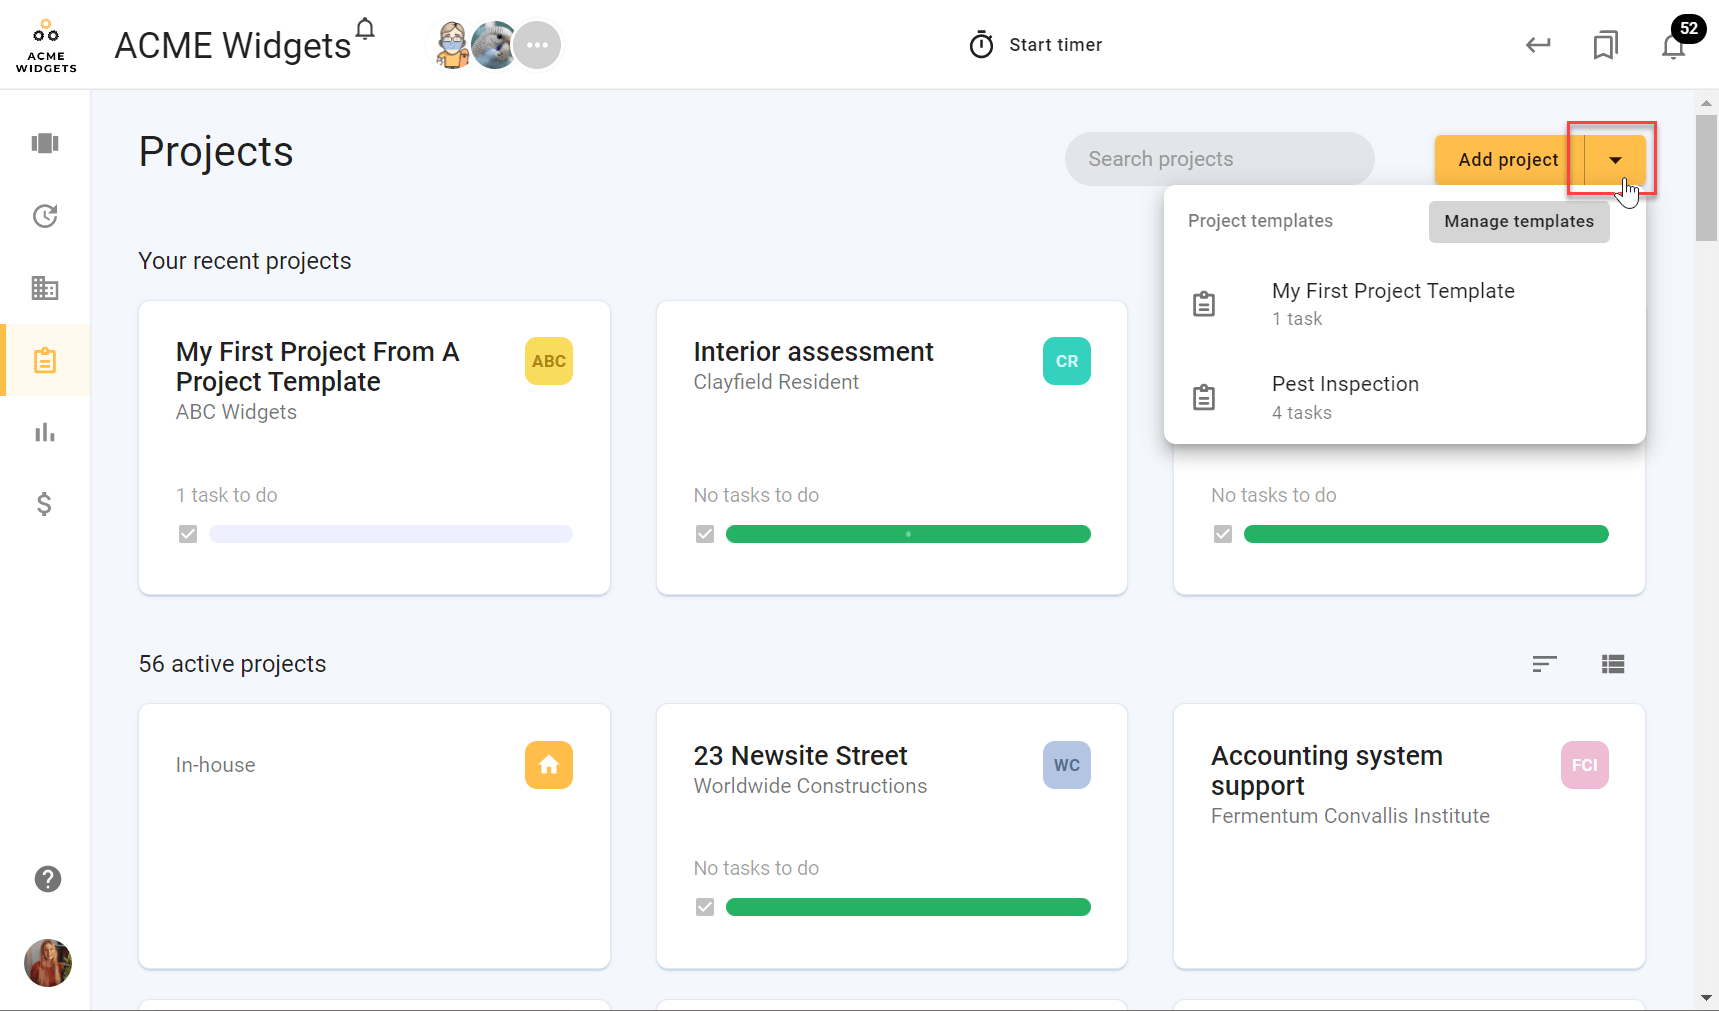
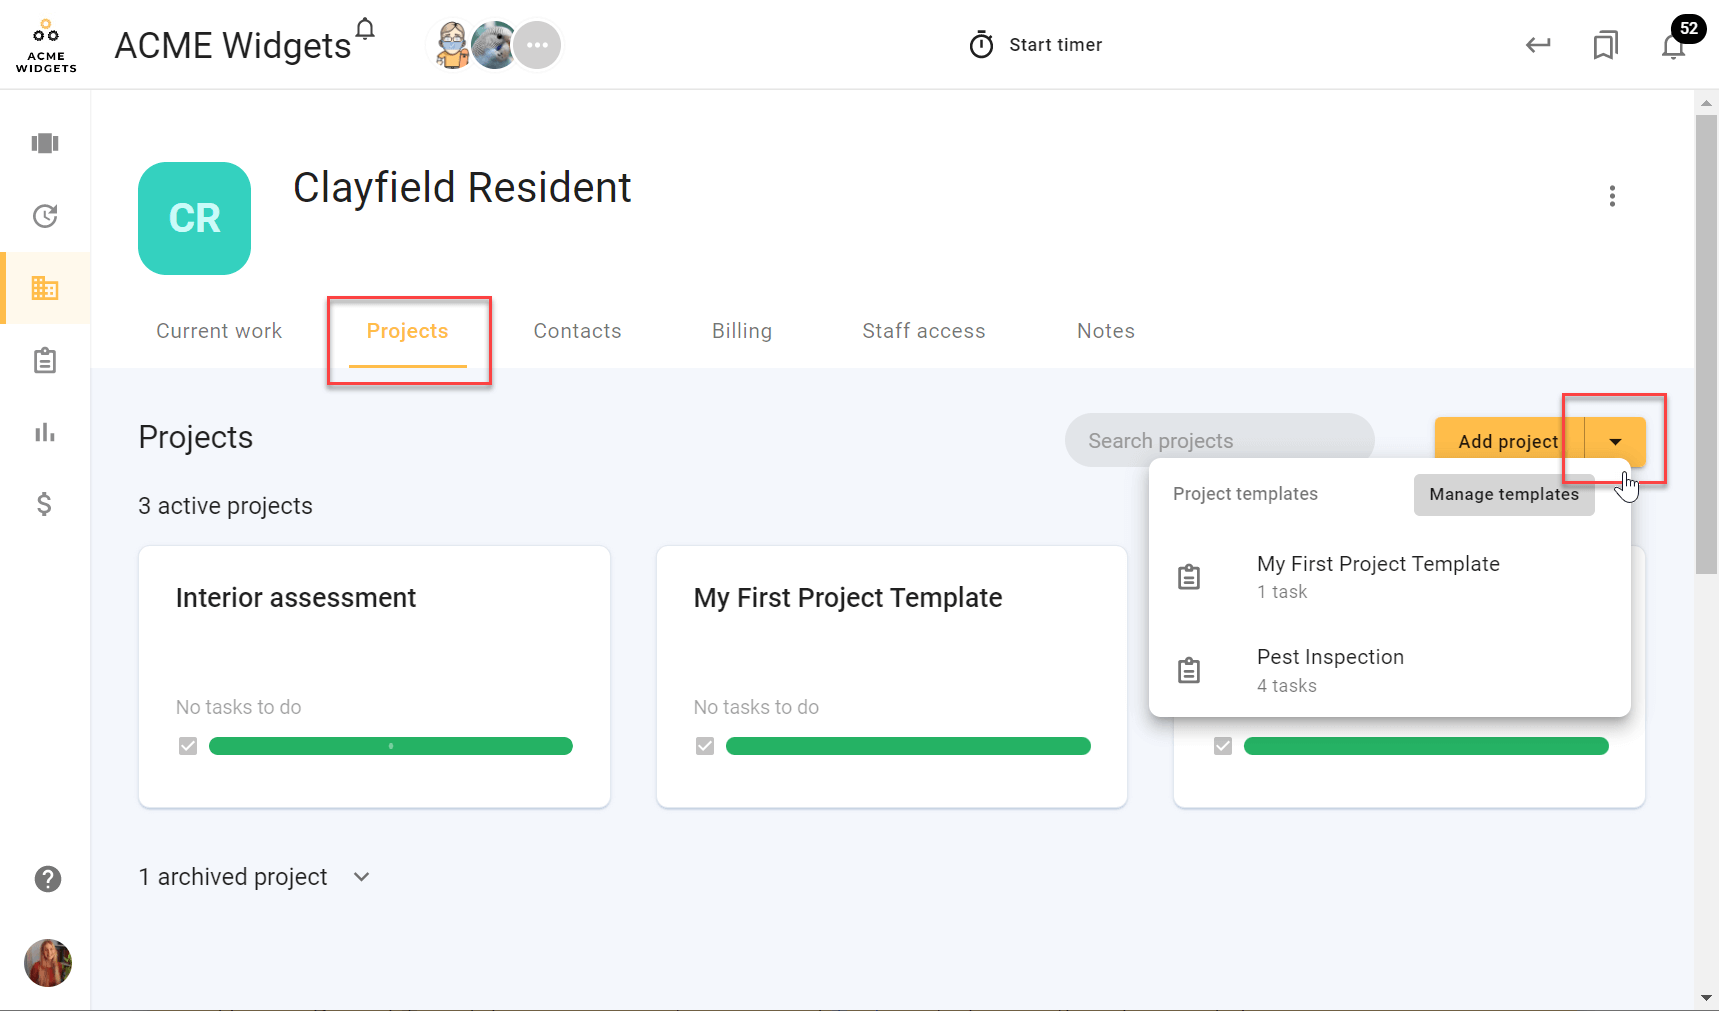
While on todo.vu’s ‘Projects’ page, click the drop-down menu on the ‘Add project’ button at the top right-hand side of the dashboard.
c) the Client Dashboard
While on todo.vu’s ‘Clients’ page, select any client, and then navigate to the Projects tab within that client profile. Click the drop-down menu on the ‘Add project’ button at the top right-hand side of the dashboard.
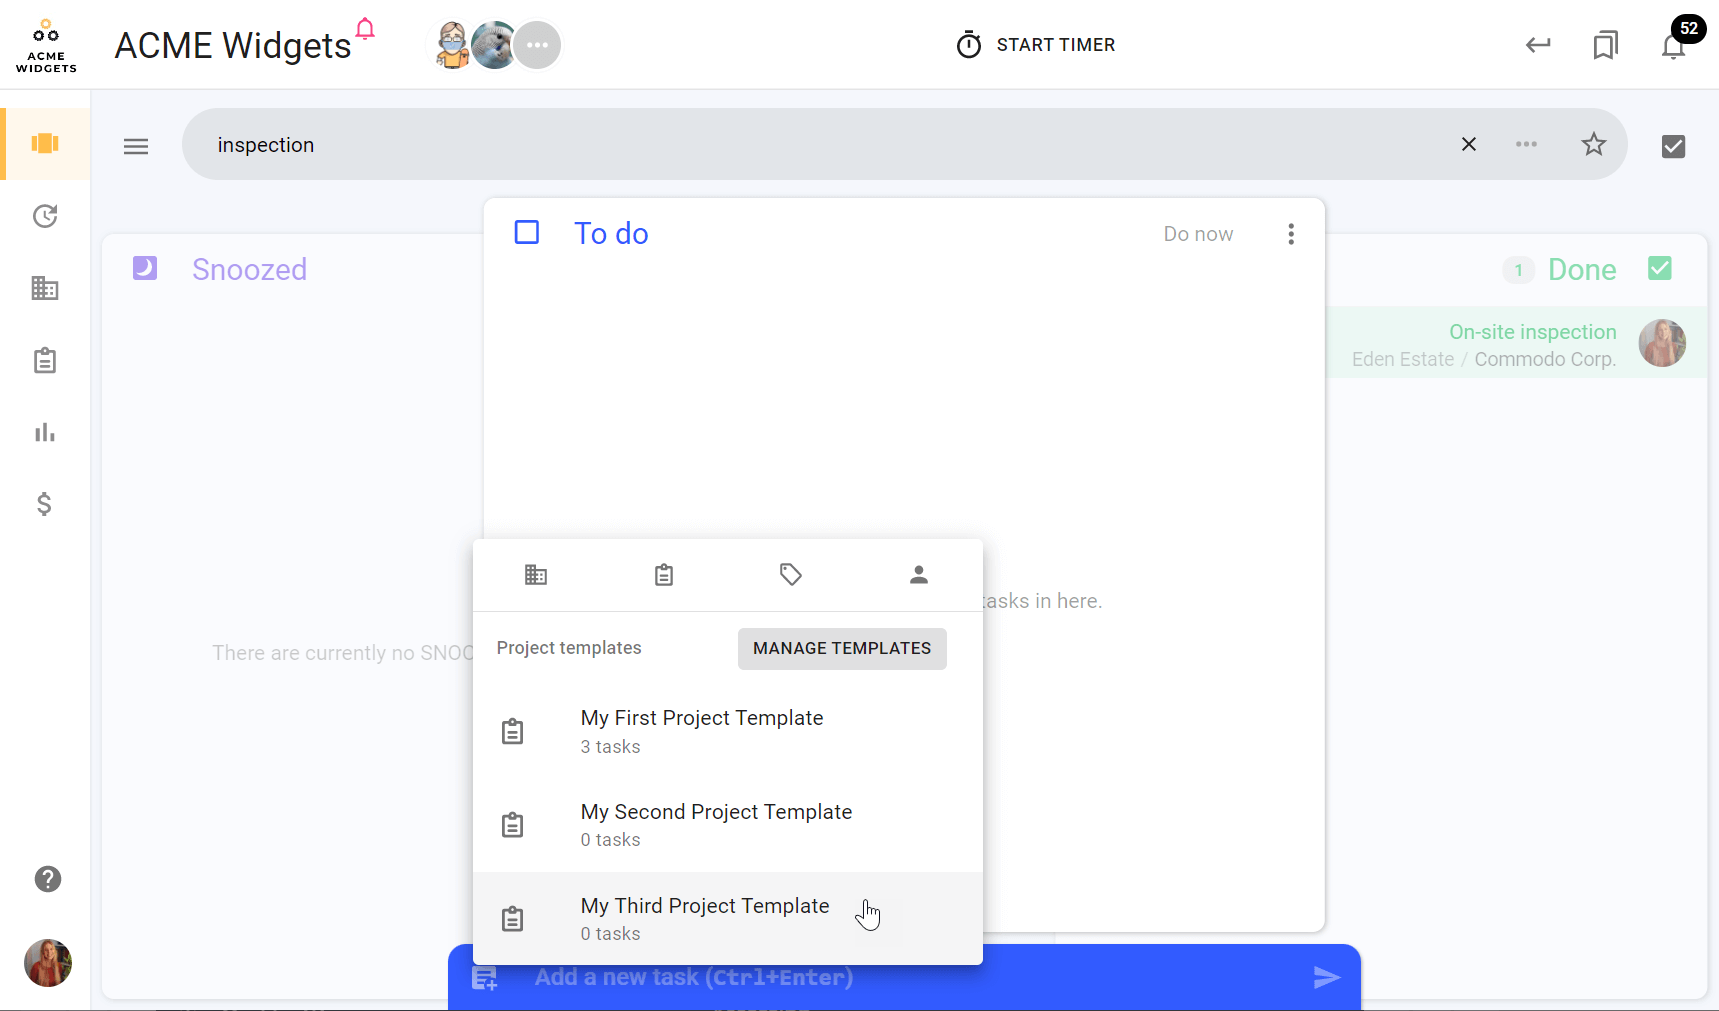
Your existing Project Templates will appear when you click the drop-down menu on the ‘Add project’ button, or the (+) icon on the Task Adder bar.
If you haven’t created any Project Templates, you won’t see any here; you will see the option to ‘Manage templates’ instead. This option is static across all todo.vu dashboards, regardless of how many Project Templates you have.
Create a Project Template
To create a new Project Template, first click the button to access your Project Template options (as detailed above), and select ‘Manage templates’. This will open your Project Template Manager.
Within the Template Manager, you will see your existing Project Templates on the left-hand side. If you do not have any Project Templates, you will see a simple layout with the option to add a new Project Template on the left-hand side of the dashboard with the (+) icon.
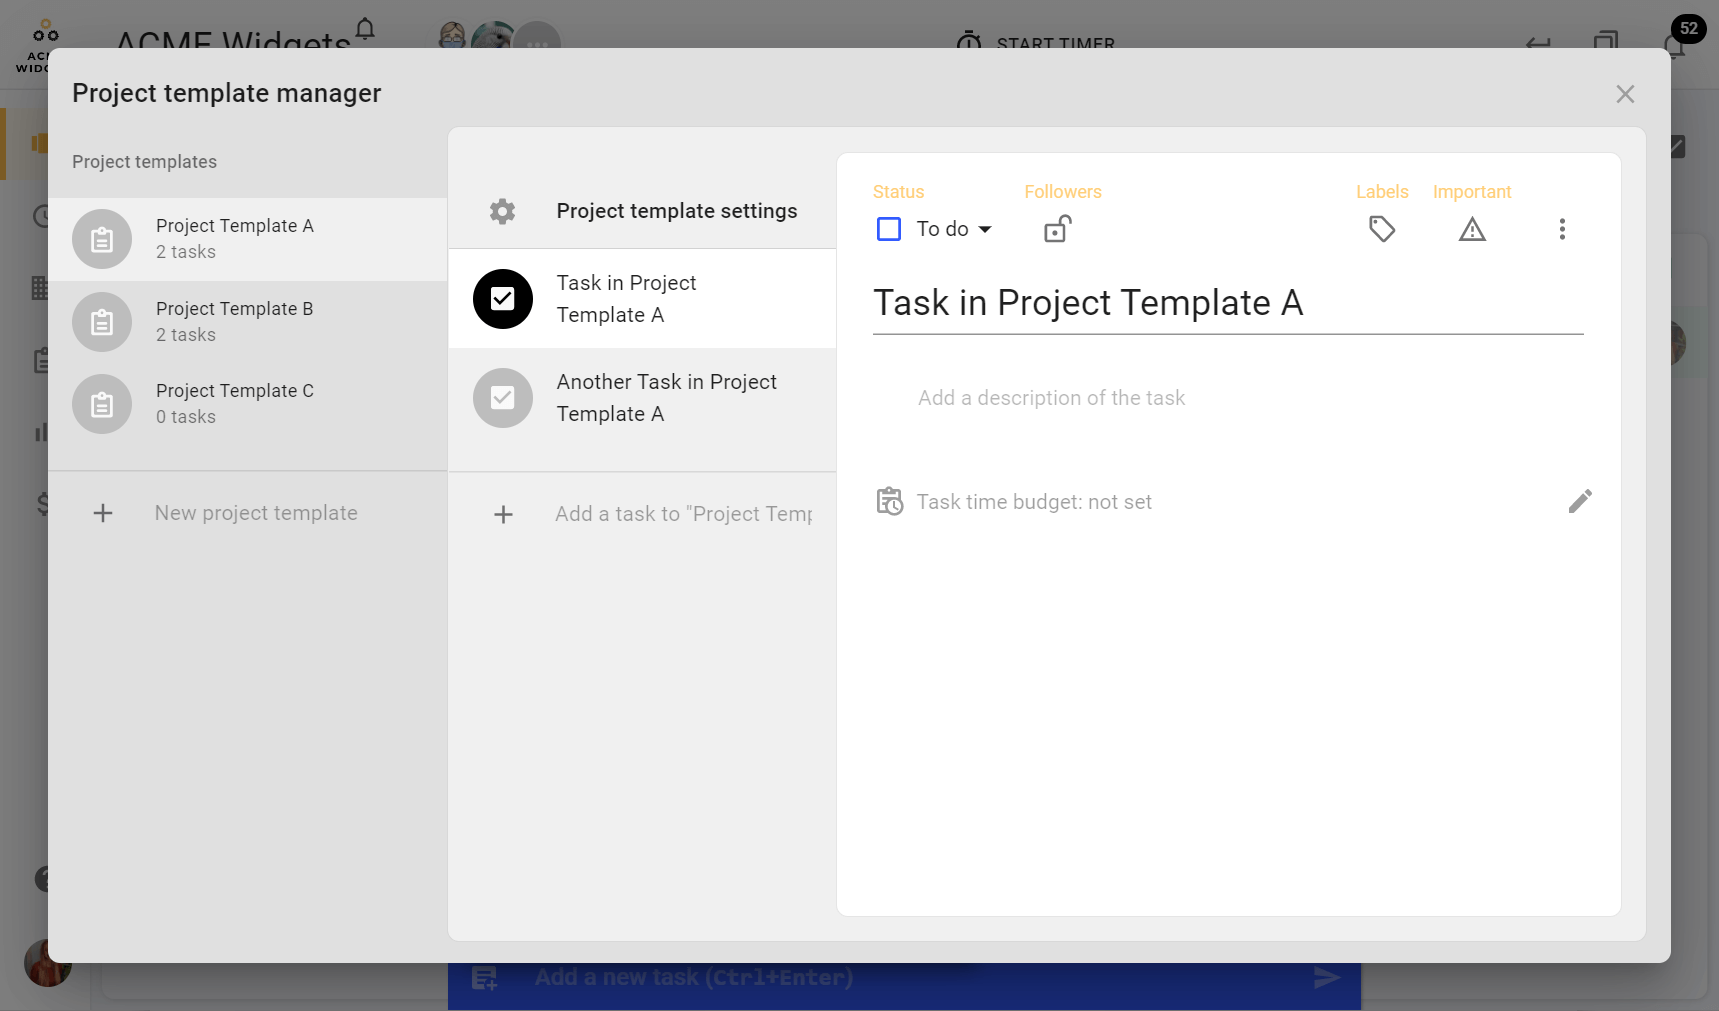
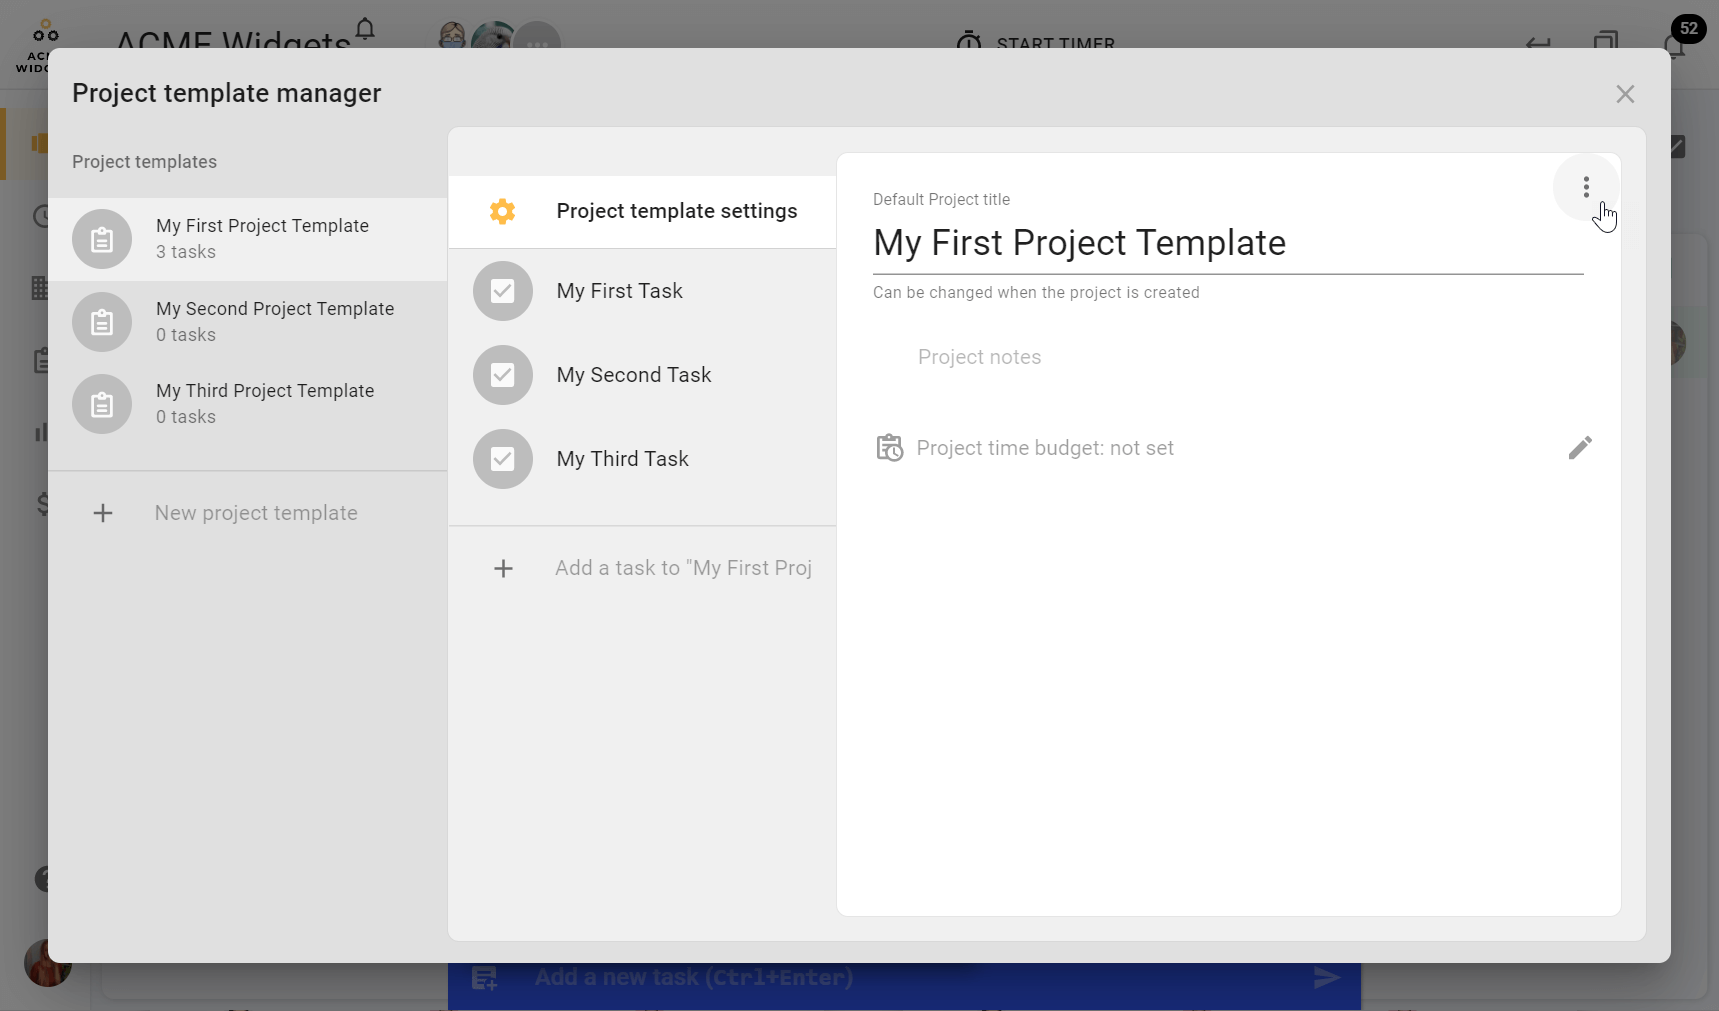
If you have existing Project Templates, your Project Template Manager will, by default, open the first Project Template in the list. You will see three columns; the first on the left-hand side is your list of pre-existing templates, the middle column is the list of your tasks in the open template, and the third on the right can have your project template settings, or the selected task of your task list, open for editing.
So, let’s create a new Project Template.
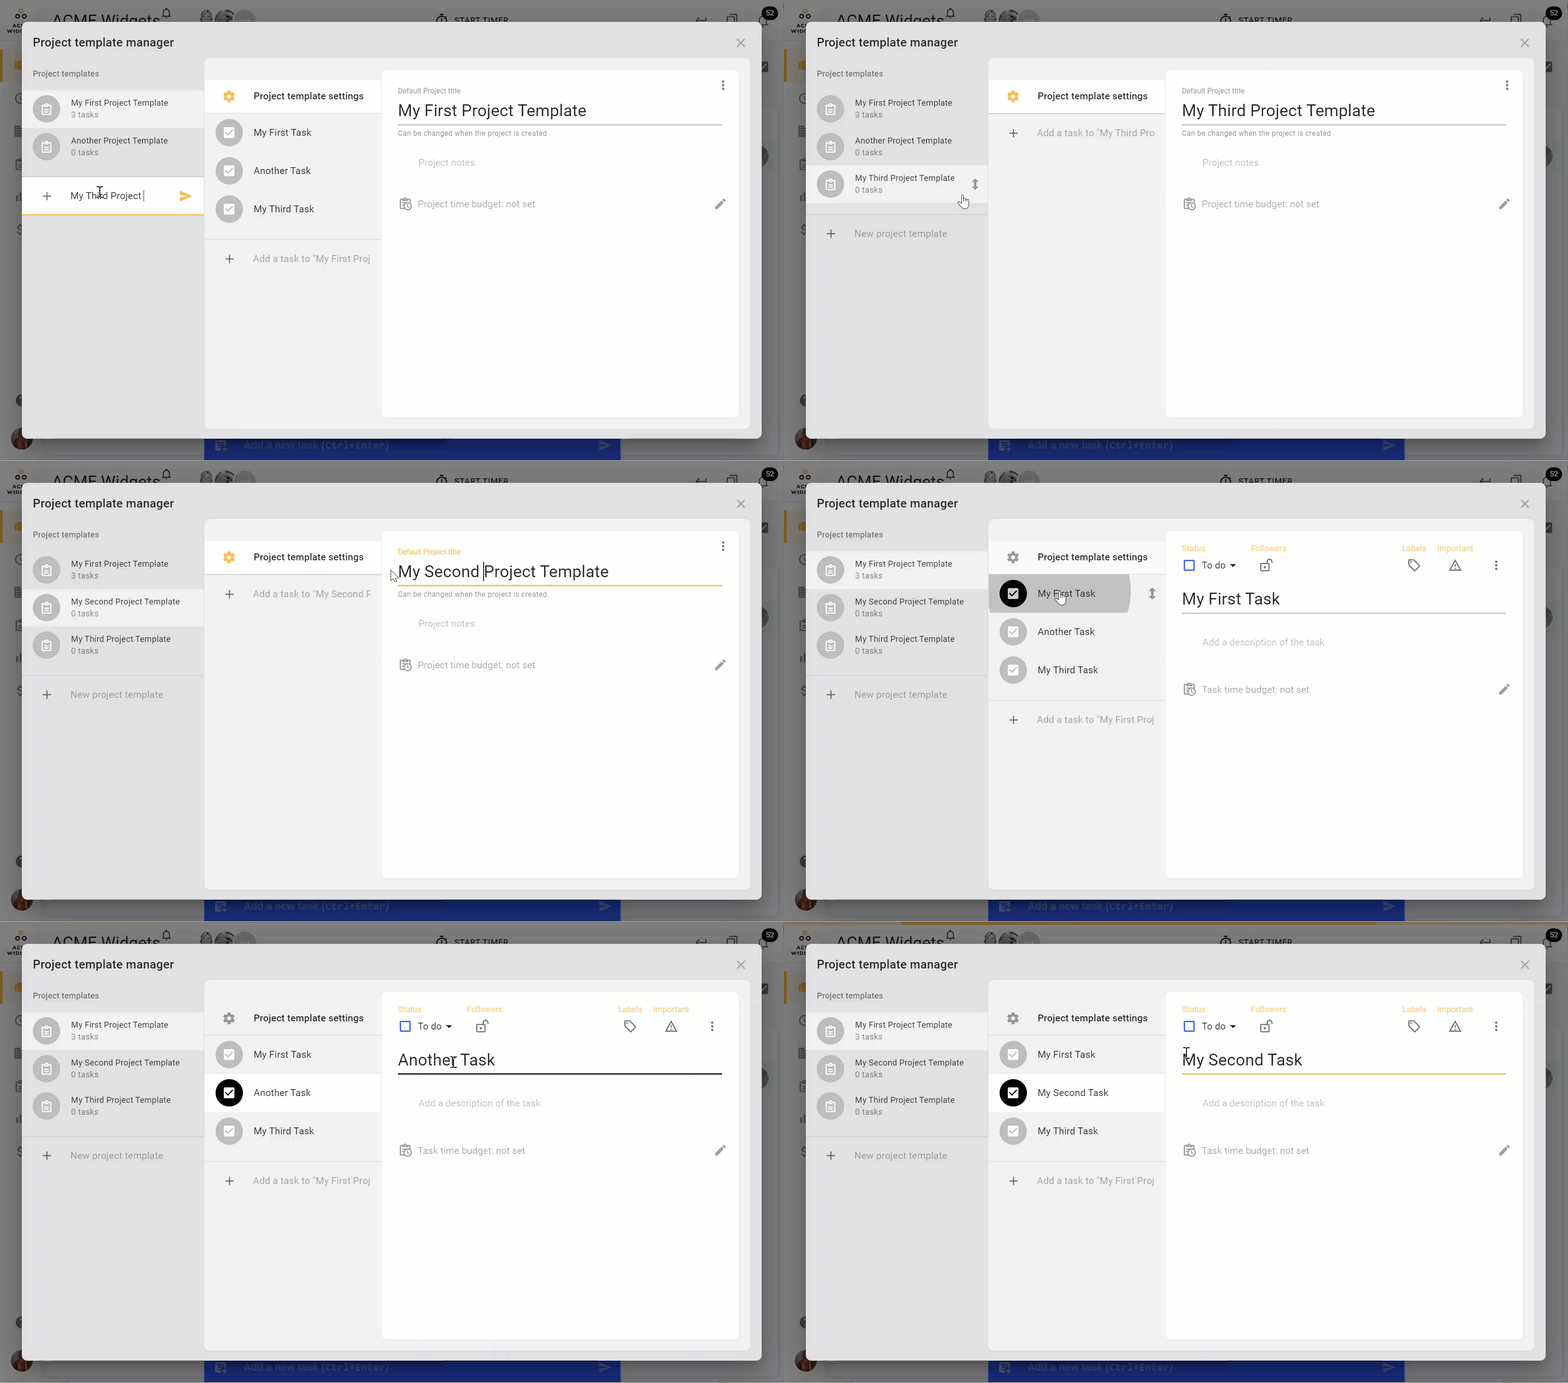
Select the (+) icon on the left-hand side within the Project Template Manager. The first thing you will have to do is name your Project Template.
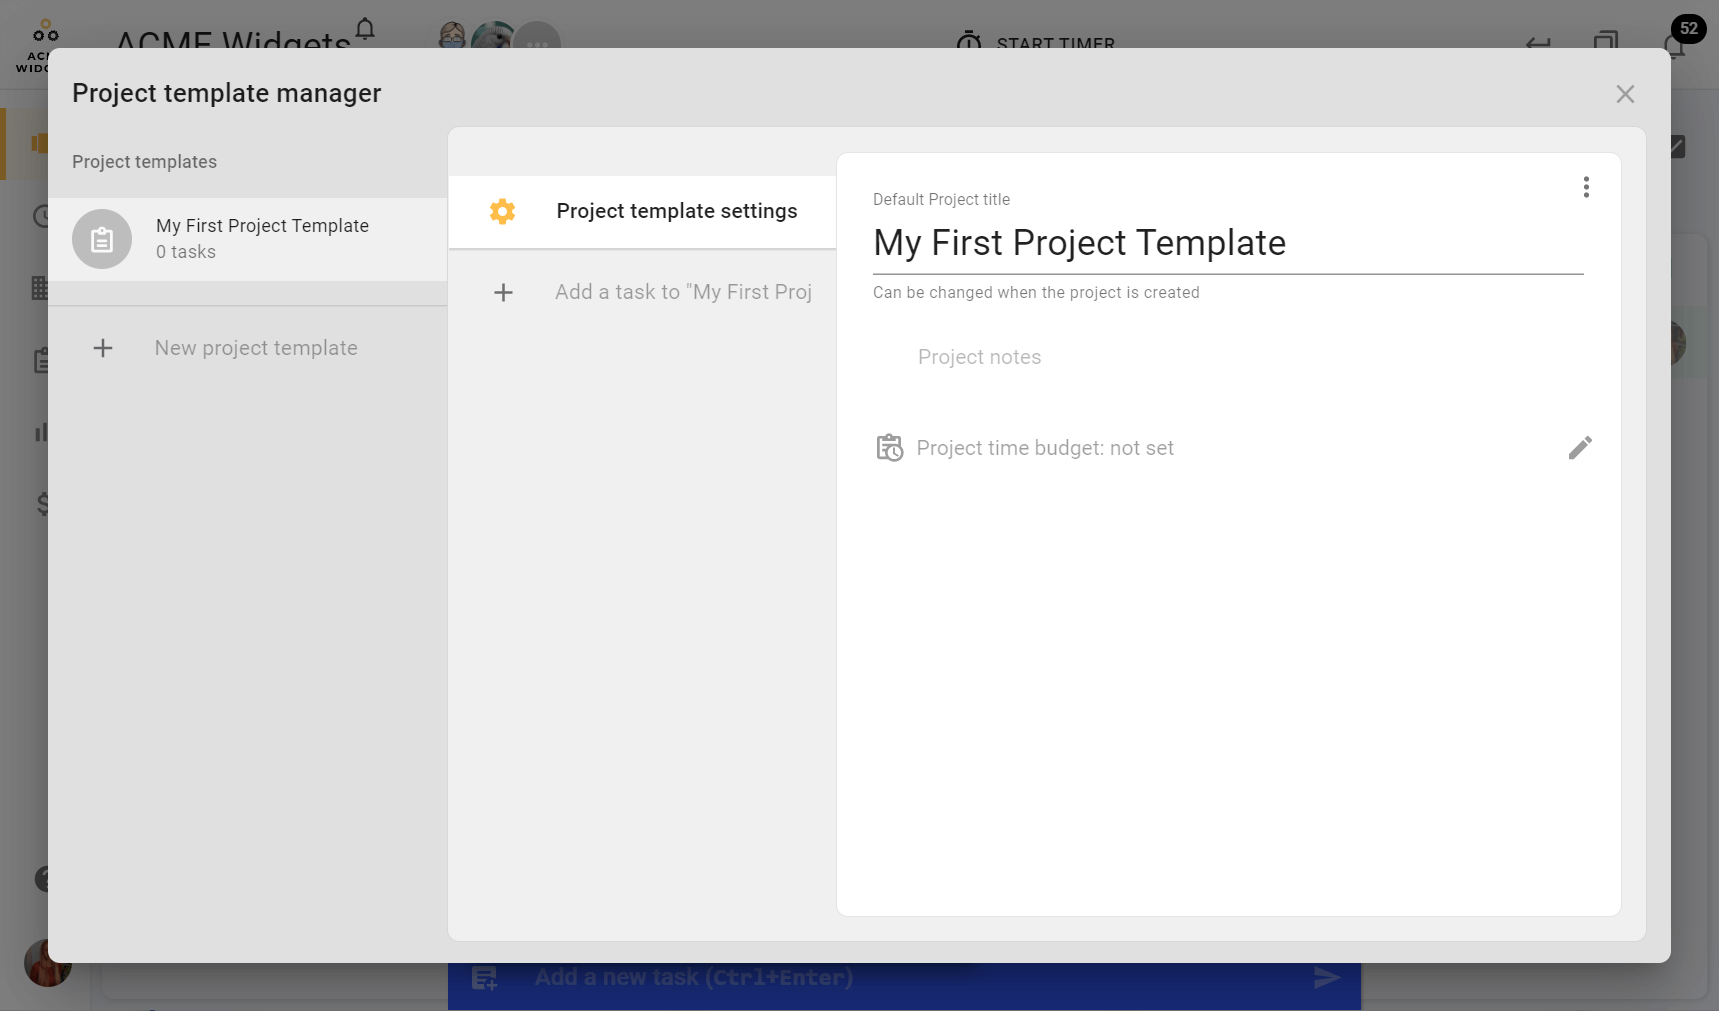
Below, we have named our new Project template, ‘My First Project Template’. Hit [Enter], or the arrow to the right, when you are finished naming your Project template.
Now, your new Project Template will have been created, and you will see three columns:
- The first column on the left will always display a list of your existing Project Templates, as well as the option to create a new one.
- The second column in the middle is where you can create tasks to add to the selected Project Template, and where you can access the selected Project Template’s settings.
- The third column is where you will make edits to the actual tasks and Project templates themselves. Which task you’re editing will change depending on your selections in the middle column, and which Project you’re editing will depend on your selection of Projects from the left column.
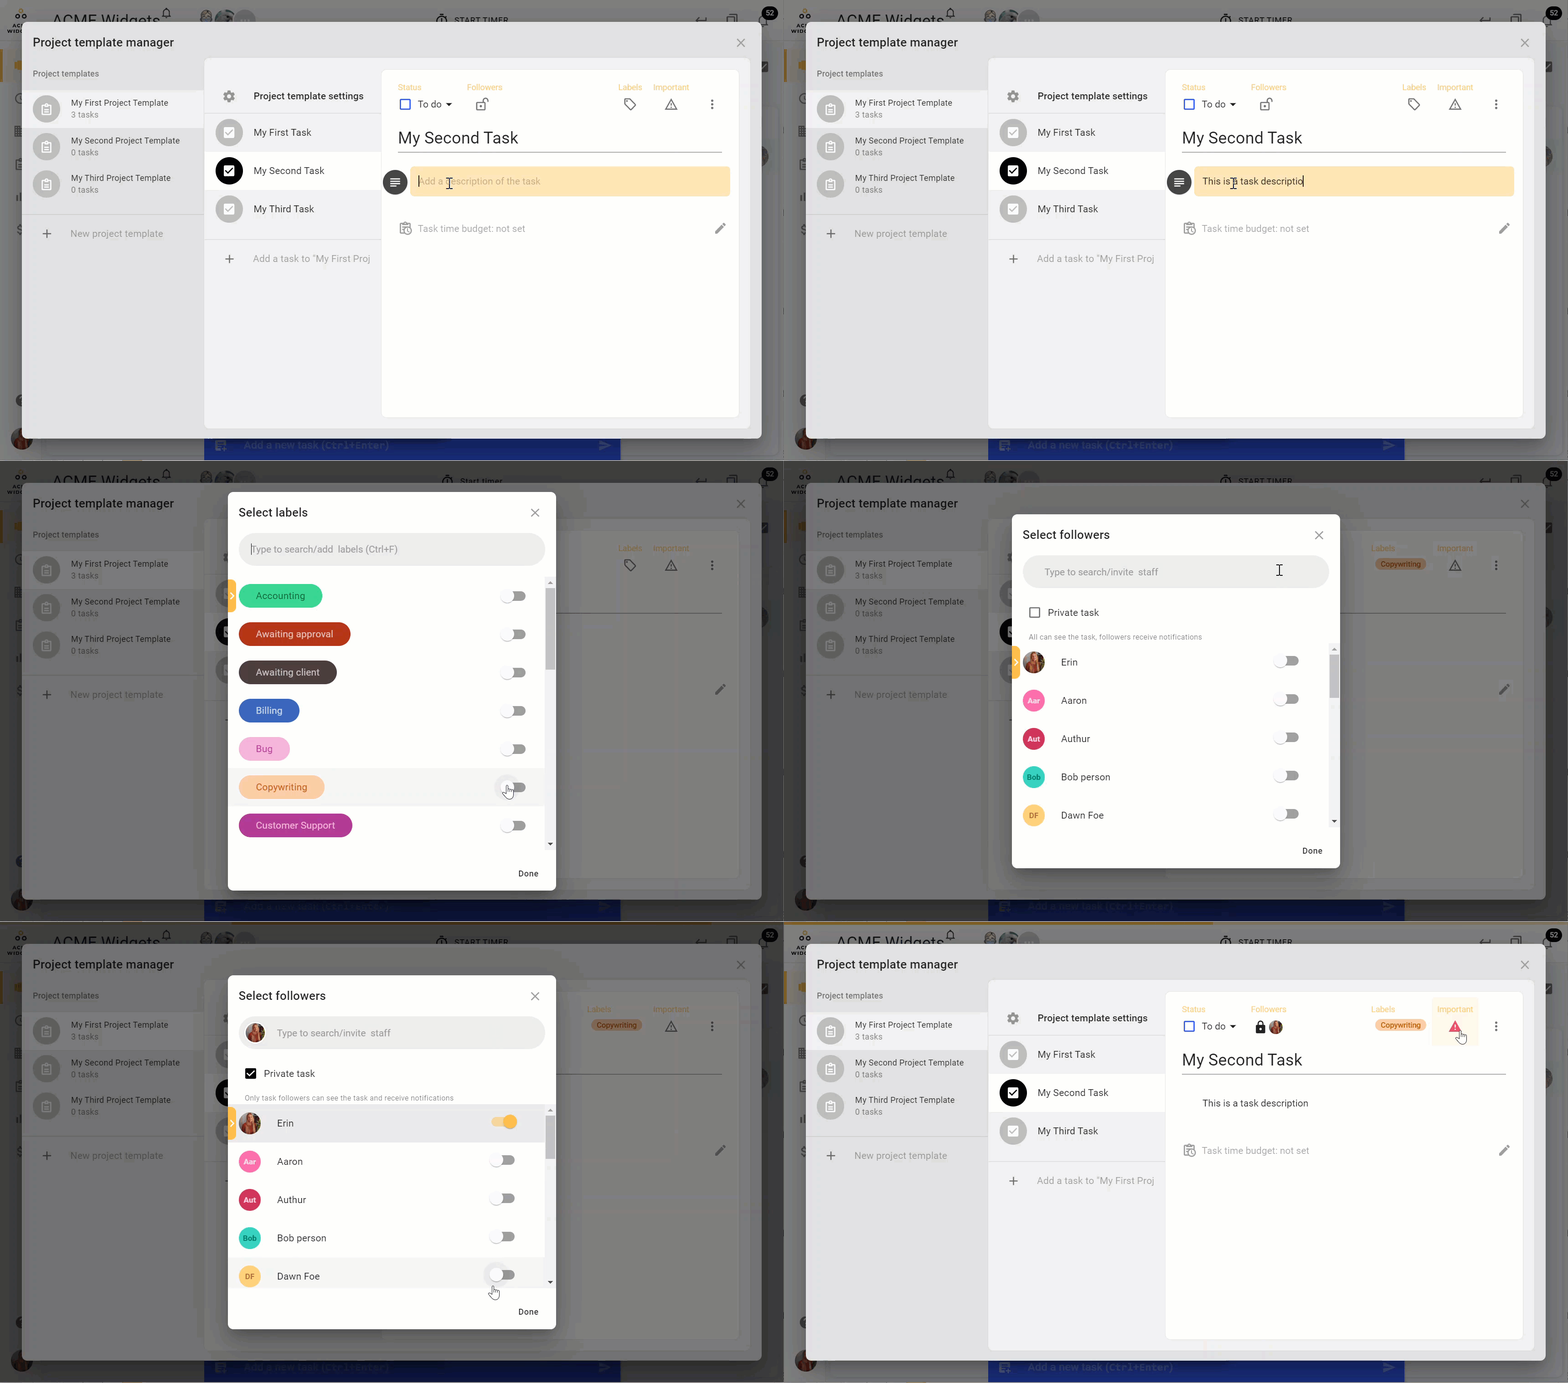
If you select ‘Project Template Settings’ at the top of the middle column, the third column will display that Project Template’s details for you to customize.
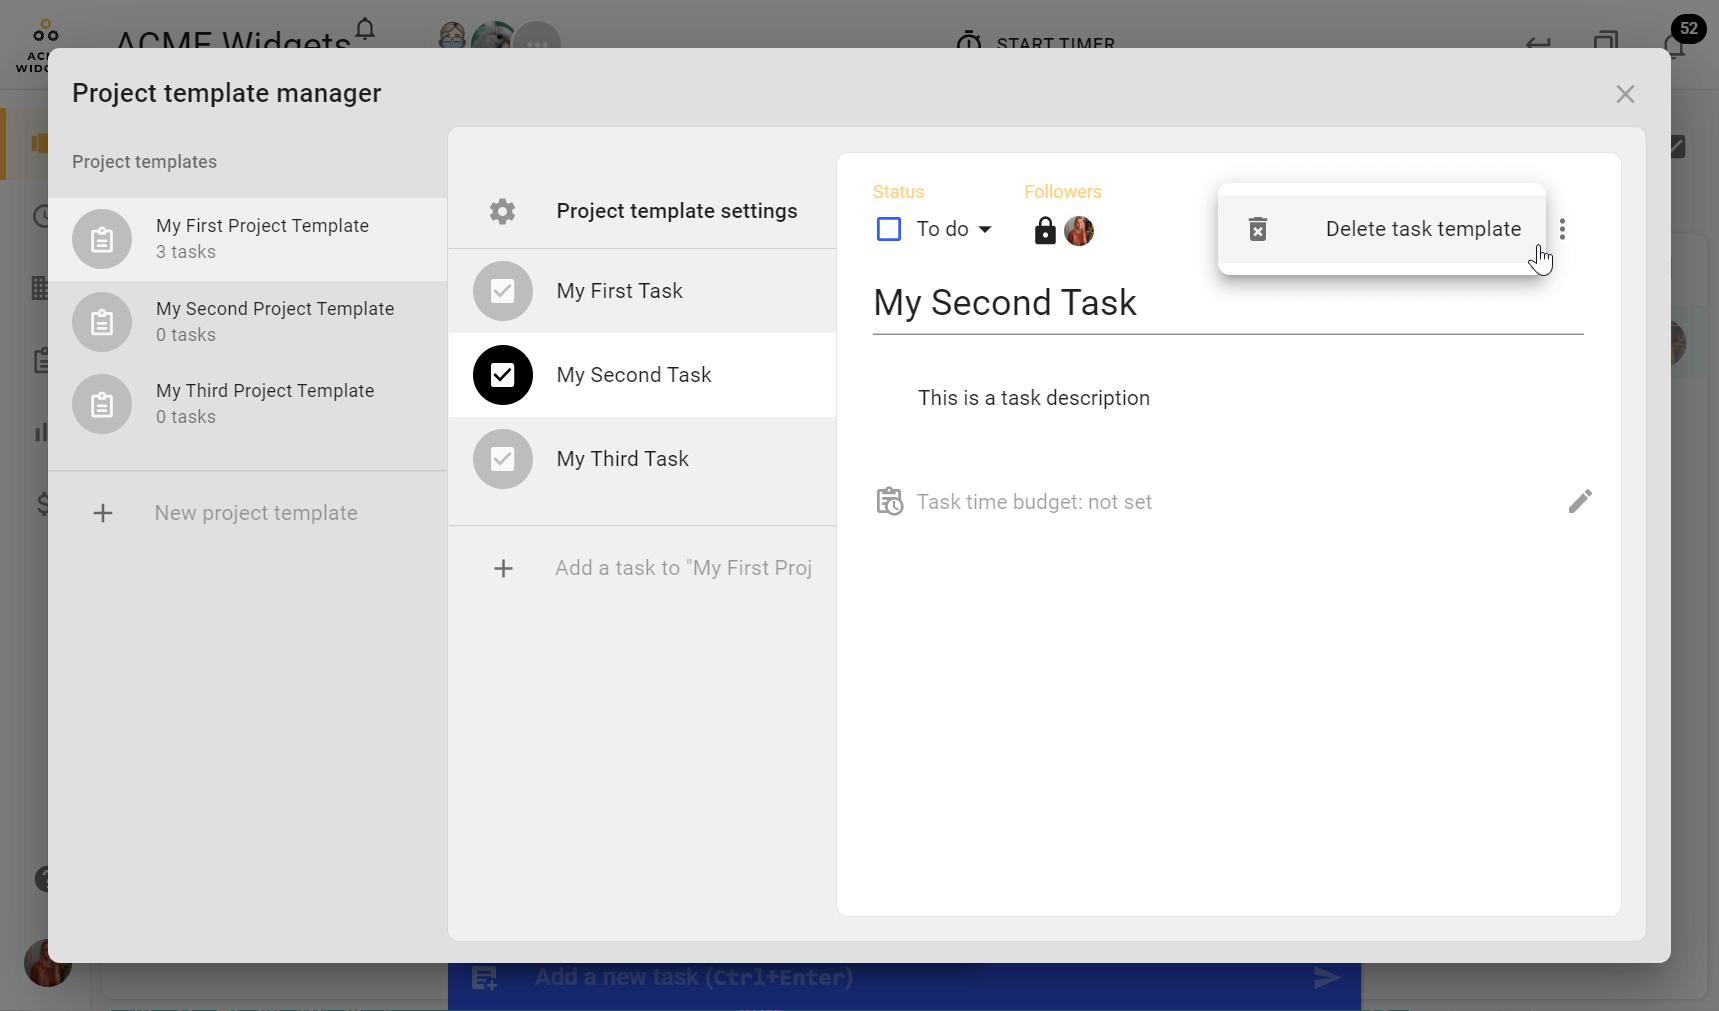
If you select a task, or create a new task, in the middle column, the third column will display that task’s details for you to customize.
Note: You can reorder items in the first and middle column’s list to suit your workflows with a drag and drop.
Remember: To add a new task to a Project template, you must first type the title of your new task next to the (+) icon, and then press [Enter] or select the arrow to the right. Then, you can continue editing your new task.
Customize your Project Template
Besides adding tasks to a Project Template, you can:
- Rename the project’s default title
- Add project notes (Including checklists, custom code, bulleted lists)
- Set a project time budget.
Customize your Project Template’s tasks
To a Project Template’s task, you can:
- Rename the task title
- Add followers (or make the task private)
- Set the task’s workflow status (To-Do, Snoozed or Draft)
- Add task labels
- Mark the task as ‘Important’
- Add a task description (including checklists, task links, custom code, bulleted lists)
- Set a task time budget
Note: Task templates don’t support all of the same functionalities as purely creating a task directly in your Workspace does. However, once the task is live in the Dashboard it will have full functionality.
For instance, while a task is in Template mode, users cannot:
- Leave comments on the task
- Upload files to the task
- Add an Assignee to the task, though when using the Template, you will be prompted to add an Assignee in the final step of sending it to the Dashboard
- Add a client to the task; though if you create or use a Project Template through the Client Dashboard, it will automatically add that client
- Add an ‘Unsnooze’ date
- Set a due date.
Note: You don’t have to ‘Save’ your Project Templates, as they automatically save as you go. When you’re finished creating or editing your Project Template and want to exit the Project Template Manager, simply hit the (x) icon in the top right-hand corner.
Using a Project Template (Send a project live to the Workspace)
When you want to use a Project Template; that is, to create a new project from your template in your Workspace, you can simply click on the desired template that appears when you open the Project Template menu, which is found either on the:
- Task Dashboard (click the icon on the Task Adder bar)
- Client Dashboard (click the downwards arrow next to the ‘Add Project’ button on the Projects tab)
- Projects Dashboard (click the downwards arrow next to the ‘Add Project’ button).
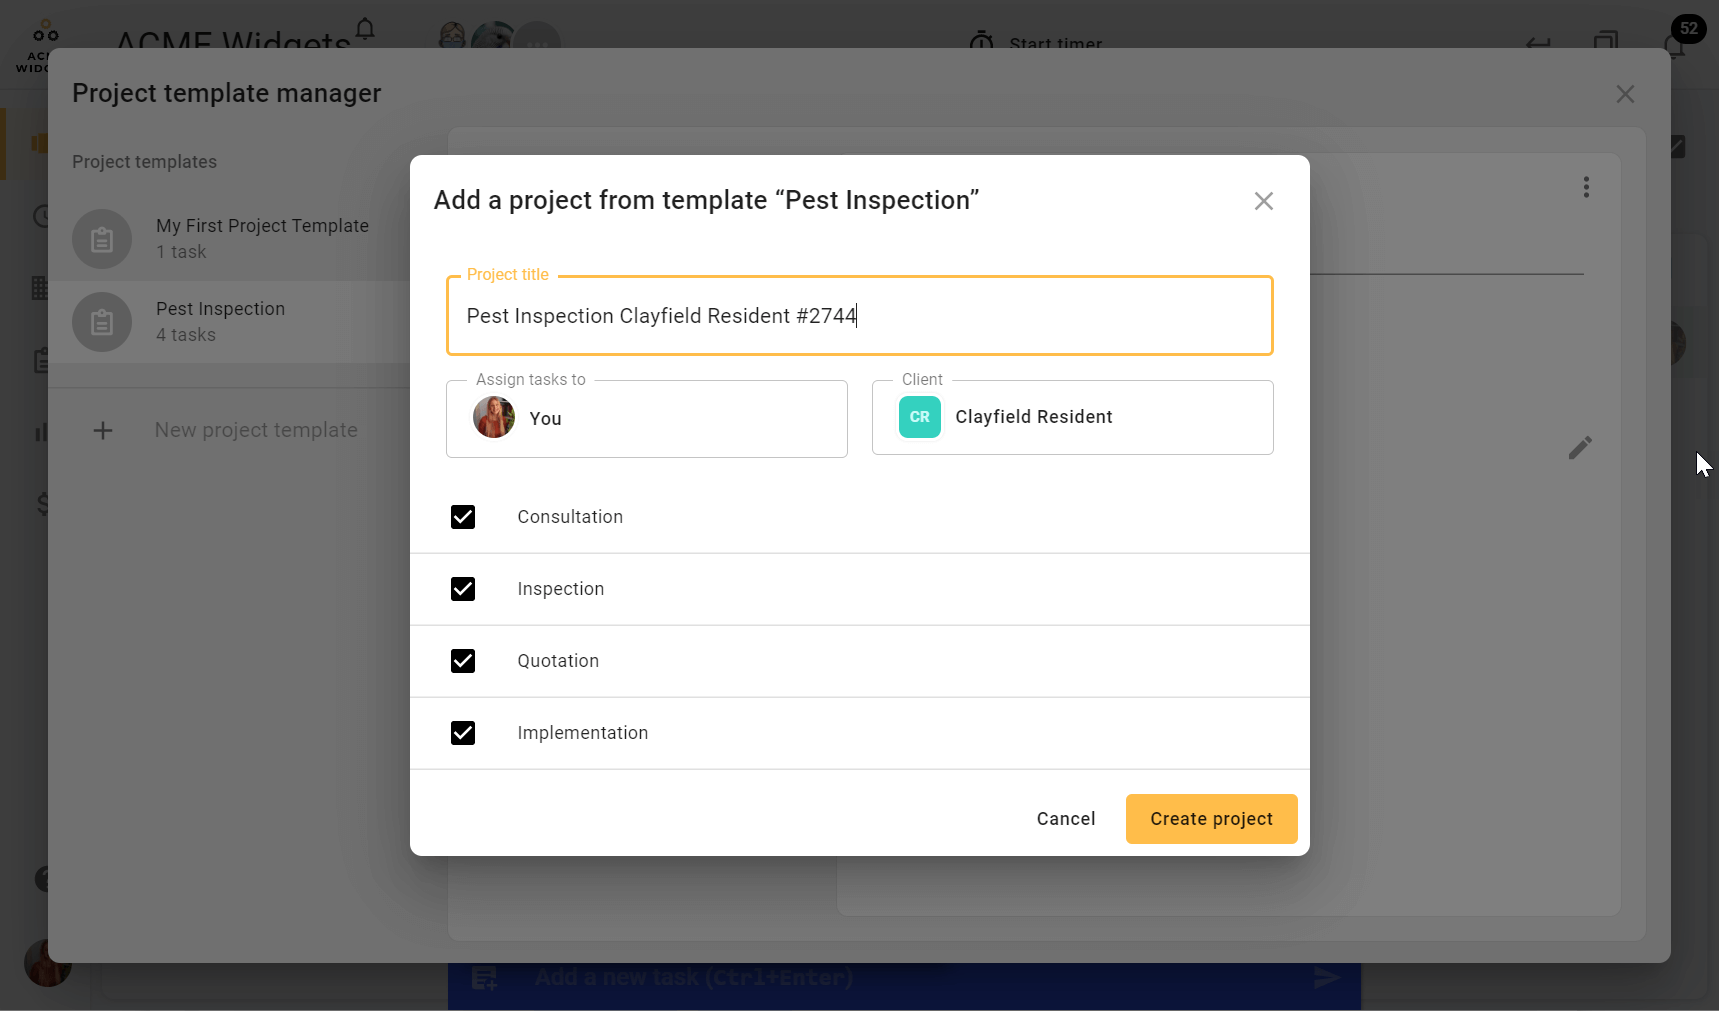
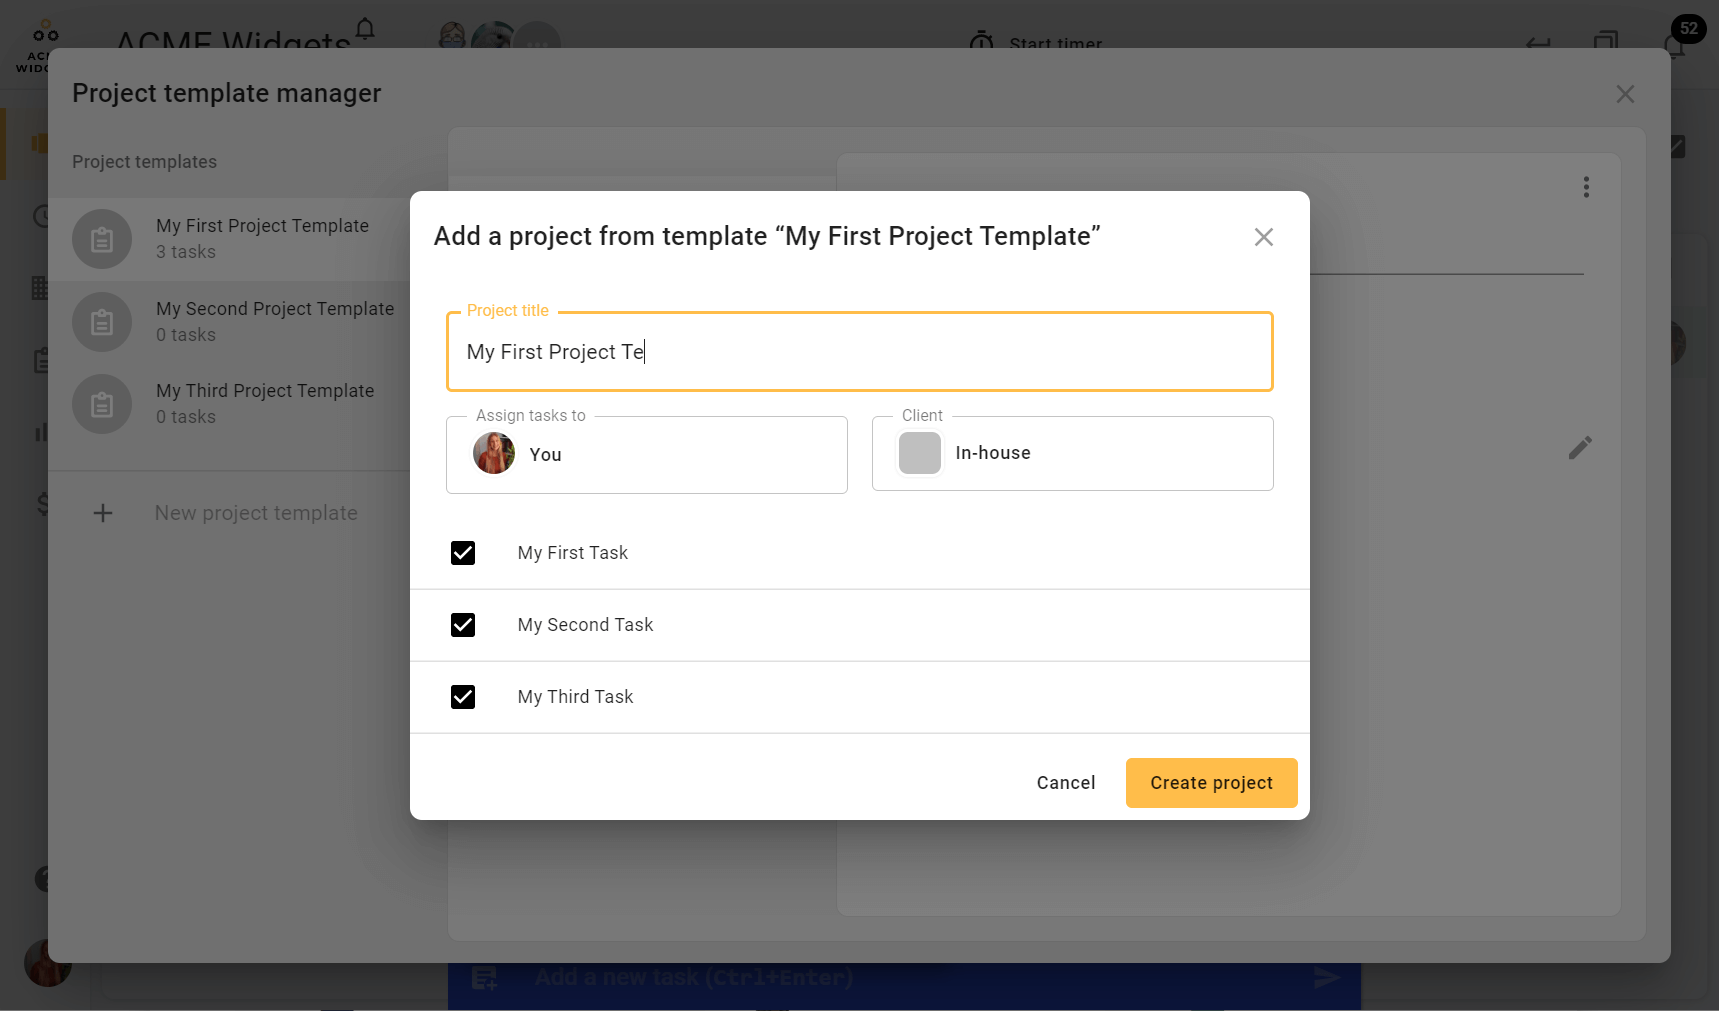
A pop-up window will appear. Here, you will have to configure a few options. It is important that you do this carefully.
Most importantly, when it comes to the Project Title.
If you do not have a distinct Project Title, then you may end up with several Projects of the same name, which can quickly become confusing.
Then, you can choose:
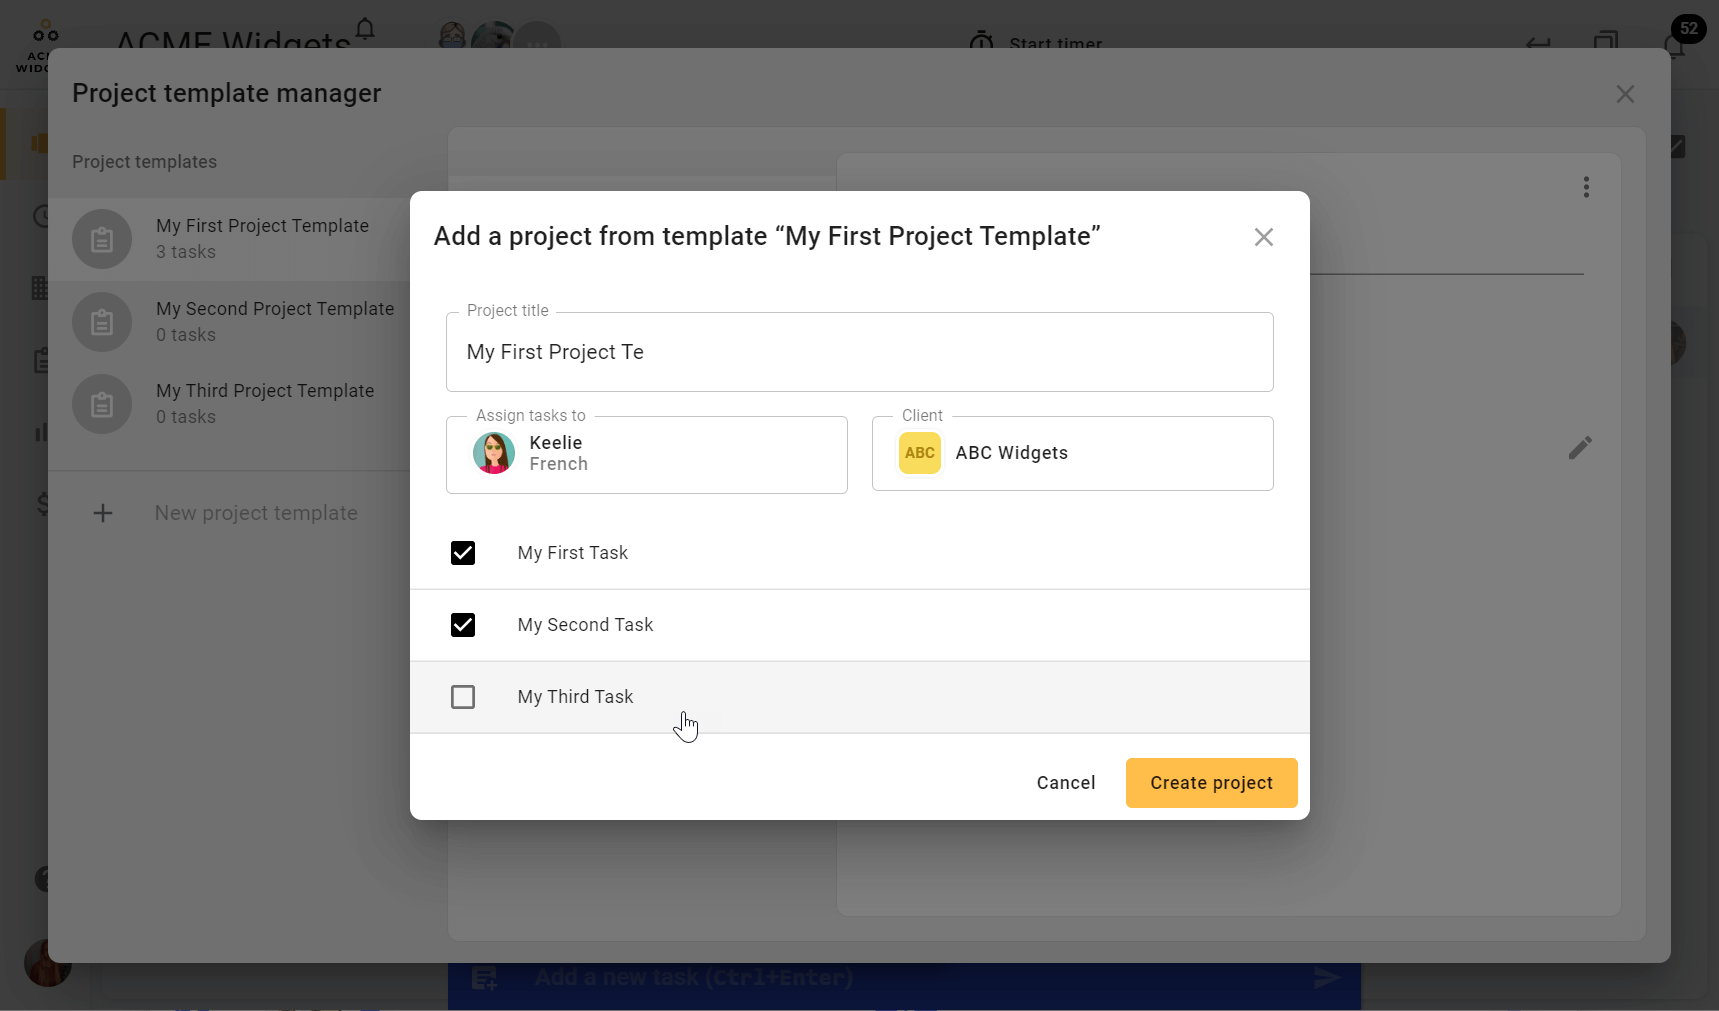
- Which tasks, if not all, you want to send live to the Workspace as part of this project. Simply untick the boxes next to the tasks that you do not want to include.
- An assignee – that is, the user responsible for the tasks being sent live to the Workspace as part of this project.
You can also add new clients and invite new staff on the fly here, too. All you have to do is type in the name of the new client or staff when prompted from the pop-up window that appears when you select either the ‘Assign tasks to’ or ‘Client’ fields.
Now, you can hit ‘Create project’.
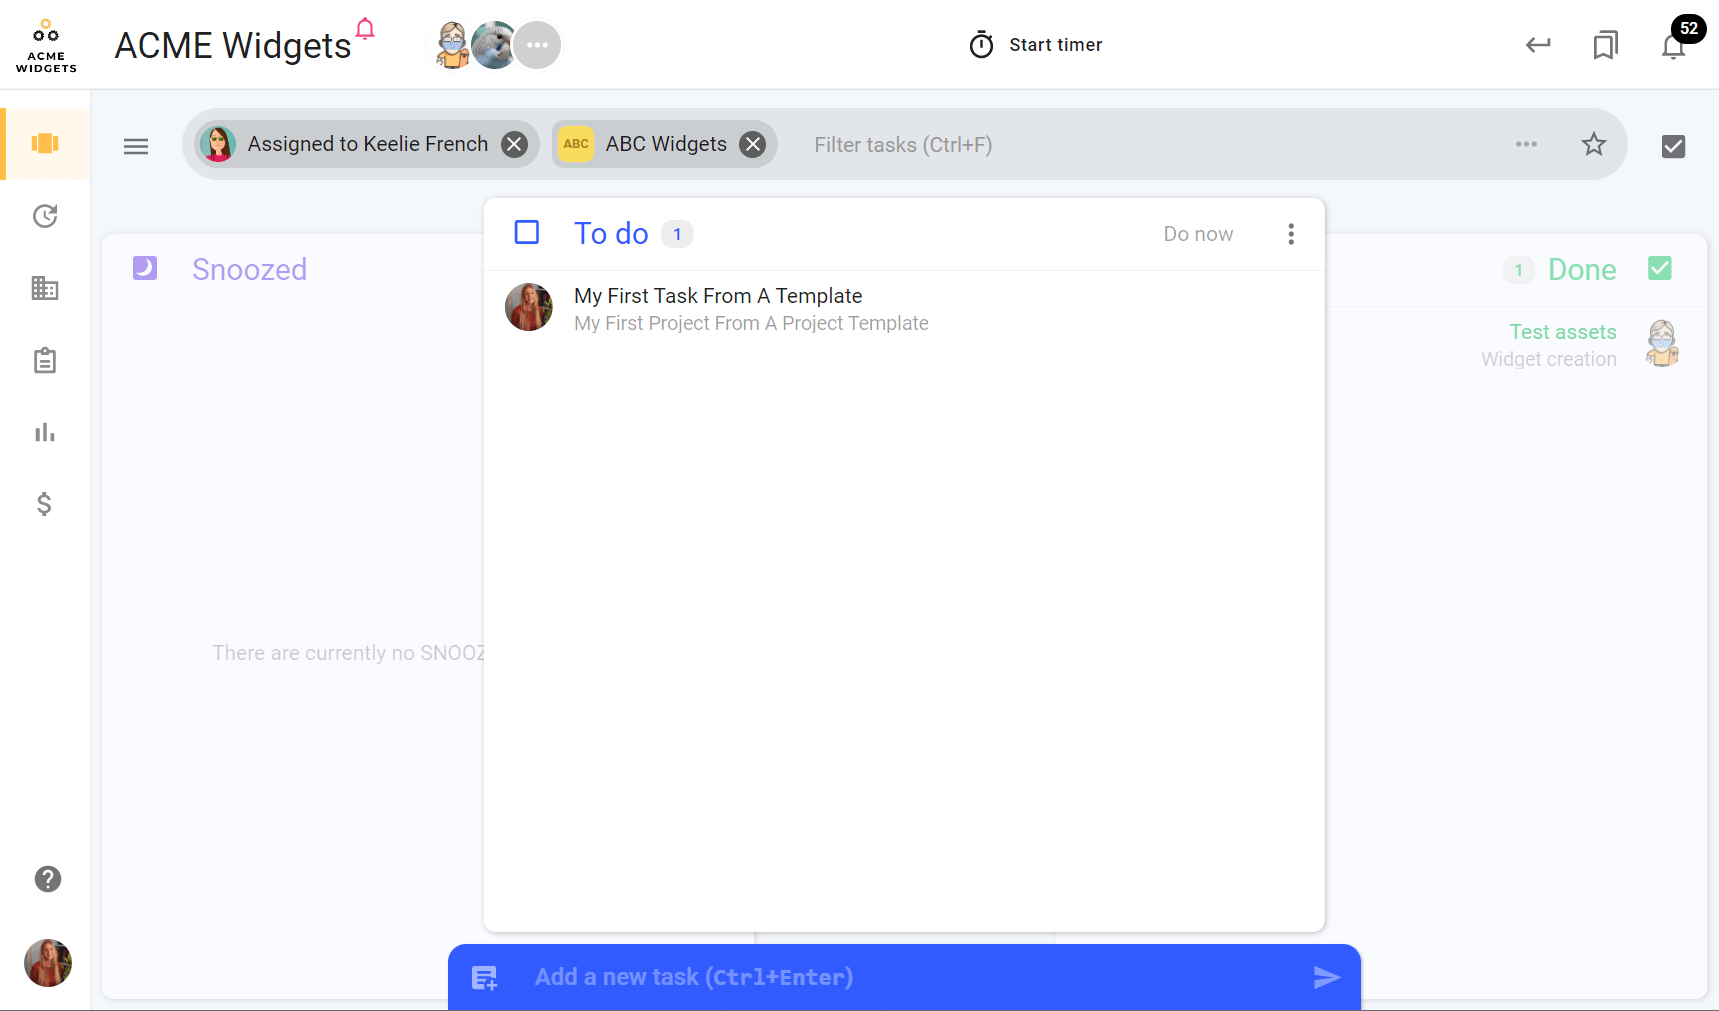
Note: When you use a Project Template from the Task Dashboard, after you hit ‘Create project’, you will automatically be taken back to the Task Dashboard. It will be filtered to show the tasks in your new project.
If any of your tasks created from the Project Template were given a ‘Snoozed’ workflow status or created as a ‘Draft’, they will appear as such.
When you use a Project Template from the Projects Tab on the Client Dashboard, after you hit ‘Create project’, you will remain on the Client Dashboard. Likewise, if you use a Project Template from the Projects Dashboard, after you hit ‘Create project’, you will remain on the Projects Dashboard.
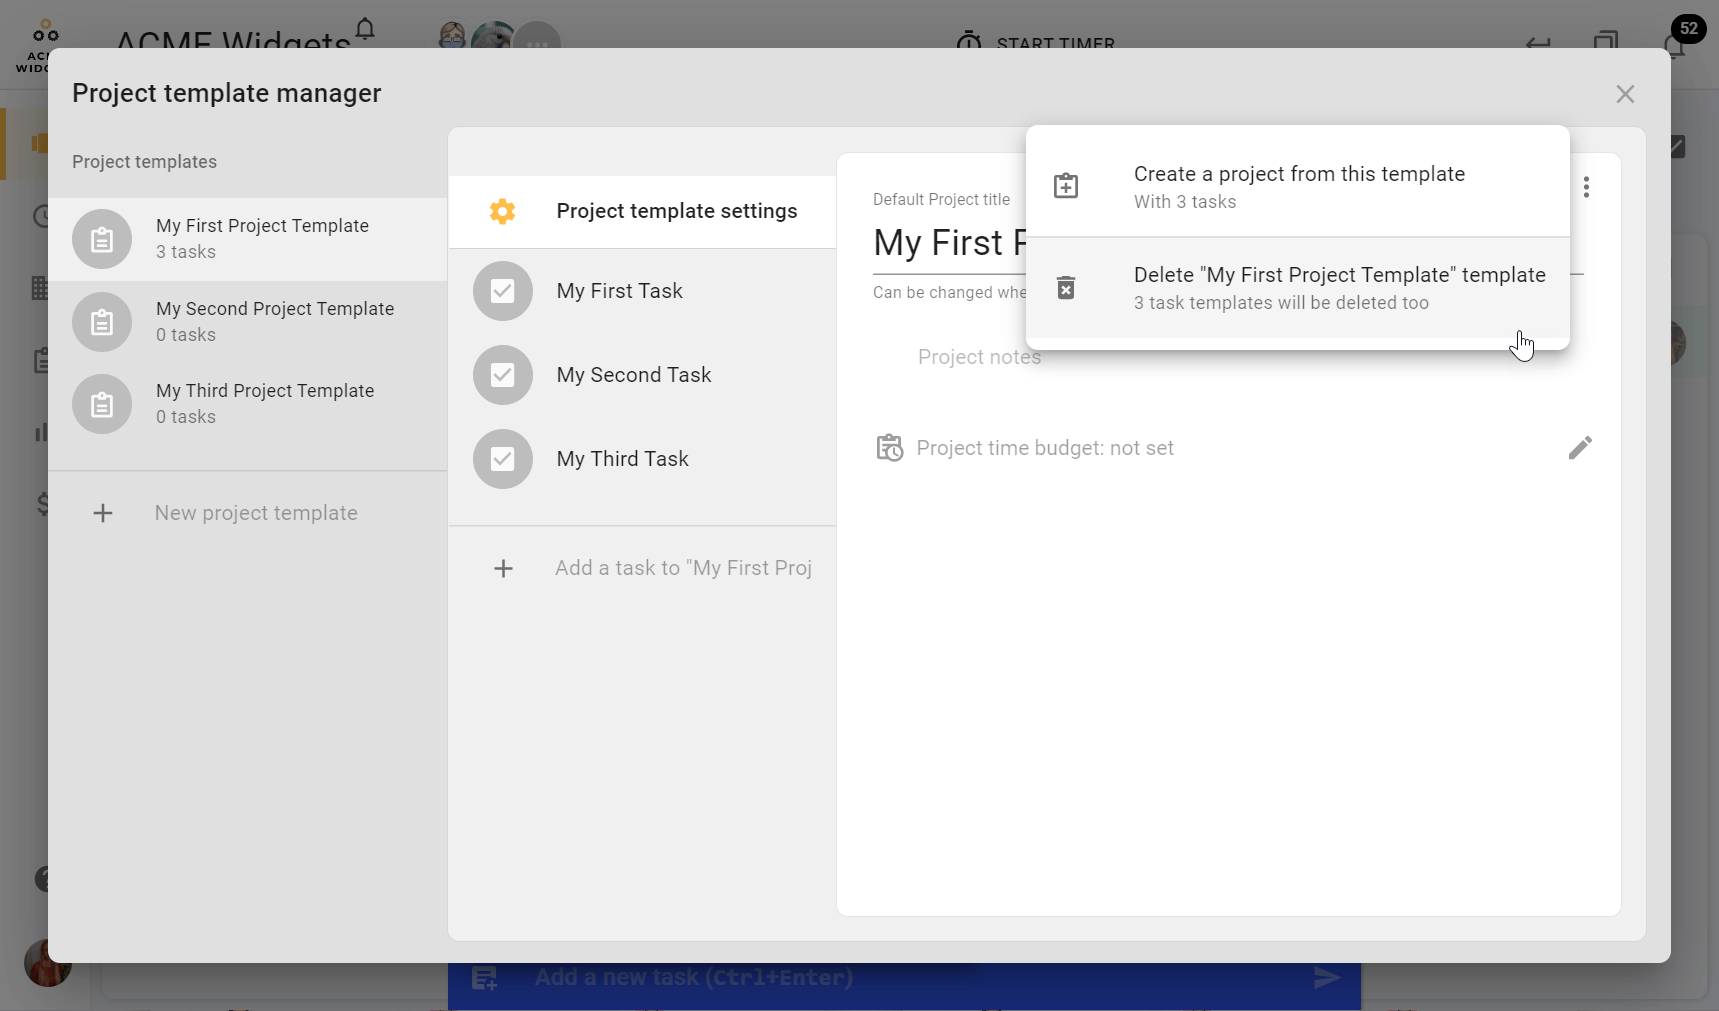
While within the Project Template Manager, the only way to send a project live to your Workspace is through the Project Template Settings. Select ‘Project template settings’ from within the middle column of the manager, and then select the three-dot menu at the top right-hand side of the third column.
You can also delete a Project Template from here.
Delete a Project or Task Template
You can delete a Project Template from within your Project Settings. Select the Project Template you want to delete from the left column in the Template Manager. Select ‘Project Settings’ in the middle column, and then select the three dots that appear in the right-hand corner of the right column.
You will see there the option to delete that Project Template. This cannot be undone.
If you would like to delete a Task Template, simply select the Task Template you want to delete from the middle column in the Template Manager, then select the same three dots that appear in the right-hand corner of the right column.
FAQs
Have questions? If you can’t find what you need, or would like more support, please contact us at tom@todo.vu.
Why might I want to drag and drop my tasks (reorder) within a Project Template?
You can manually sort tasks within the Task Dashboard (provided you have chosen this mode) to help prioritise them.
All staff see the tasks in the same order. When you build a Project Template, therefore, you may wish to set the task order in the template so that the newly created tasks maintain that order when they’re pushed live to the Workspace.
Should I use a Project Template or todo.vu’s Repeating Tasks feature?
Repeating tasks are ideal if you have a single todo.vu task that you want to automatically repeat many times.
Project Templates work well when you need to reuse a set of multiple tasks. Project templates are deployed manually.
Why might I want to create a Draft task in a Project Template?
When a new todo.vu task is created in the ‘To do’ Workflow state, it automatically sends an alert to the task’s assignee.
However, if you plan to assign different tasks to different people or you wish to tweak the tasks before anybody is alerted, then you would want to set the initial state of the tasks to Draft.
That will allow you to deploy the new project, adjust the task settings then batch publish the tasks when you’re ready.

